Quantcast
Channel: One Man's Lonely Adventures In His R33 Skyline GT-R
Viewing all 336 articles
Browse latest View live

Update #2 from Mine's...

$
0
0
So got an update from Mine's earlier today. Turns out, the problem was not one burst hose but two! Not sure exactly which hoses (they were behind the engine), but likely due to normal wear and tear? Or is something else to blame? I'll find out when I pick up the car hopefully later this week.

I had also mentioned when I dropped the car off, to Nakayama-san, that my car's exhaust stunk.  In fact it was overpoweringly bad. Mine's is reporting that this is because the catalytic converter (Apex'i Super Catalyzer) is dead.  I suspected this, in fact, and was thinking about getting another one to replace it.

from Apex'i website - http://www.apexi.co.jp/products/exhaust/cata.html

The Apex'i replaced the OEM one that was on the car when I bought it. This was a couple of years even before I had the Mine's engine put it, circa early 2006.

At the time, in my research I found that the Apex'i was the best catalytic converter because it had the lowest cell per square inch (cpsi) of only 130 cpsi - most other catalytic converters were in the 200 range (OEM is 400) and therefore more constrictive.

However, I always believed that catalytic converters pretty much lasted the entire life of the car, although now I suspect that is only true if your car is not highly tuned.

But a relief the smell wasn't necessarily caused by the engine. I've asked Mine's to go ahead and install a new catalytic converter - they've recommended an R33 GT-R specific one by HKS, which happens to be the one I was looking at anyway. Hopefully they will have photos of the old one for me to see how badly it had degraded.

The HKS one has 150 psi so a slight increase, however their website claims that their catalyzers have "high purification performance" - so something to look forward to, if true.  And if for some reason the HKS fails or dies in the future, at least its replacement cost is not as much as the Apex'i.

From: http://car.indac.jp/product_shousai.asp?hin=10123126012

In any case, as Mine's has the car for a few more days,  I've decided to ask them to do a full check of the car, in order to see if there are any other parts that could be suspect.  I'll post what (if anything) they find.  Hopefully this whole incident was just a wake up call for me to pay more attention to my car!

Stay tuned...

Back from Mine's... Fixed and Improved!

$
0
0
So yesterday morning I went down and retrieved my car from Mine's.

The culprit for the smoke that required the visit to Mine's this time around, was this particular hose at the back-side of the engine:
You can see some rust in the crack - from not having a sufficient amount of coolant in the system, apparently
Photo courtesy of Richard (fellow R33 GTR owner from the UK),
whose car suffered the same problem, at about the same time!
I was told this is one of two hoses used to cool the OEM oil-water heat exchanger, located in back above the starter motor, and below the fuel rail and assorted wiring. Nakayama-san replaced both for good measure.

I scoured the web but just could not find a photo that showed clearly where these hoses attach (it really is a huge mess), so instead:

In this excerpt from the repair manual, you can see how those two hoses connect to the oil cooler. however if someone has a better photo and verification, I would be most grateful!

To replace these hoses, they chose to remove the transmission to access the back of the engine.  They then flushed the coolant system, and checked for leaks. So now there shouldn't be any more problems going forward... at least not with these hoses.

Thus, the engine did not have to be removed, which means I was not tempted to open the wallet and install those optional goodies I was hinting at.  Perhaps next time!

Although, from my research on this, I am now not sure why this piece is still there.  That is, on a road only car, this oil cooler mechanism is obviously enough to keep the oil temperatures in check; but you need an external one if you run your car on a track, however once you install that optional external oil cooler, not sure why this needs to remain. In fact wouldn't it work backwards and heat up the coolant?  Someone said that this could be to warm up the oil as the coolant warms up faster, but that doesn't really make sense as oil should be designed to lubricate at even colder temps. So I wonder if this should be removed in the future (one less thing to go wrong), or kept as a back up just in case?  And, I wonder if these 4 hoses (shown in the diagram) are available in silicon?

In any case, Nakayama-san inspected the engine and confirmed that the engine suffered no problems from the incident. So that is a relief.

As for the catalytic converter, they weren't kidding when they told me it was "dead." Check this out!
Looks like the honeycomb has degraded quite badly
Other side... when I held this up to the light, could barely see ANY light coming through!
So I suspect that this degraded and clogged up catalytic converter was doing me no favors.  I asked why OEM catalytic converters last for the life of the car, while this one only lasted for about 8 years. The answer is, of course, the more free flow nature of these aftermarket ones, plus the additional power of the tuned up engine.

In any case, I've now got the HKS catalyzer installed, and the first thing I noticed wasn't just that everything smelled nicer (or more precisely, no smell at all...) but that the engine seemed more eager and responsive.

If I recall correctly, this is how the engine was back when I had it installed - very revvy, like a motorcycle engine, and extremely responsive (the engine was put in about one year after the Apexi catalyzer was installed so presumably it was still working well then).  Boost comes on much quicker and the turbos make that funny whooshing sound much more clearly and frequently now.

And this is still with the bung installed on the Tomei exhaust...I'm now tempted to run the car without the bung and with a de-cat, just to unleash its full potential!

In any case, this incident has been a wake up call, so I think I will be having more work done on the car very soon. Stay tuned!

Silent Running... or Am I Going to Damage The Engine?

$
0
0
By now, everyone knows that the Tomei Powered EXPREME titanium exhaust which I fitted to my car (after having served as the jig during the design of the EXPREME exhaust) is loud. In fact, for use in Japan, the exhaust is labelled as for off-road use only.  Clearly it does not have the JASMA sticker which would indicate it passes certain criteria to be considered "street legal."

In any case, the loudness does me no favors - if I want to leave my house early, or come home late, it wakes up the neighbors.  Of course I use the Tomei supplied bung, but it still doesn't really quiet it to the level of a regular road car.  And of course, the bung defeats the purpose of a race exhaust, as it means I run around with a half blocked exhaust.

Of course I'd run the car without the bung, and the response is noticeably improved.  It makes the connection between right foot and engine, extremely direct.

So basically, I got tired of the compromise known as the "exhaust bung"

This lead me to some research. I quickly learned that A'PEXi had produced a manual, wire operated "Exhaust Control Valve":


However, not only is there no cool factor, but the prospect of having to drill a hole somewhere, plus the need to always think about whether the valve was fully open or closed, was too much for me. I needed something automatic.

And then I saw an article in GT-R magazine for a product that appeared to be designed for the R35 - the Blitz E-ESC.

Basically, this is a fully programmable, motorized exhaust valve - it combines a motorized version of the A'PEXi valve:
From: http://www.blitz.co.jp/products/exsystem/eesc/e_esc.html
 With a computer brain and a controller:

Normally I might do the install myself, but I figured the scraped knuckles, and time away from family was not worth it.

So off to Be Ambitious, where Ninomiya-san did his usual great job.  I also consulted him for some other work, which will likely end up done and thus posted to this blog.
The view tonight as I picked up the car

There was also something else very weird he was working on....
Ninomiya-san, however, warned me that he thought that this device had the potential to damage the engine, due to back pressure caused by the valve in its closed position.  Further he explained, basically there was no difference in exhaust sound, from about 20% to 100%.  Which meant that any value to this device, would be from 0% to 15%.

However, at 0% the valve is closed, and the only avenue for the exhaust to escape is a small hole:

He felt that running around with the valve in this position, would cause premature wear on the engine, with the increased back pressure. There would be no advance warning either.

So he set up the device so that it would fully open at 1200 rpm. Granted, my idle is about 900-1000 rpm, so this device is closed at 0% only when I am idling, at a stop light. As soon as I step on the gas, the valve opens up to 100%.

I don't have a sound clip yet, but from driving the car home tonight, yes the car is ridiculously quiet at red lights. In fact so quiet if I didn't hear the engine noise I would wonder if the car was on.  I played with the unit a bit, and while 0% is extremely quiet, at 15%, even 20%, the car is quieter than before with the bung inserted. So if 0% puts a stress on the engine, maybe 15-20% is the way to go?

The irony, of course, is that in parking the car, I have to step on the accelerator to get the car to back into my garage.  This raises the RPMs to above 1200, which results in the full roar of the exhaust.  My wife confirmed that, from inside the house, she did not notice any difference as compared to before.

In any case - my plan for the moment is to set the device to open fully at 1200 RPMs (or should it be a higher number?), but also to set the minimum value at 15% or 20%.  What do you guys think - will this result in premature wear to my engine?  Or is this relatively harmless? Maybe there is a way I can program it so it only goes to 10% or less when I need it to....

Let me know your thoughts, please!


First Post for 2015: Sound Clip of the Blitz E-ESC

$
0
0
First, Happy New Year Everyone! 2015 will be a good year for mods, I have lots planned so whether I have the time to do stuff will be the main problem! 

Second, I had gotten some requests for a video/sound clip of the Blitz E-ESC electronic exhaust valve in action.  Unfortunately it may be a bit hard to tell the difference due to the limited sound recording capabilities of my iPhone, but I think you can somewhat tell the difference. Incidentally, it seems MUCH more quiet from INSIDE the car, but that's probably because one gets used to the drone of the Tomei exhaust at engine speeds above 1200 (so basically all the time) and then all of a sudden when the car is at a light and the revs drop to 1000... silence (ok so it's relative but heck the wife was surprised...)

You will see from the video that what Ninomiya-san (who installed the E-ESC) told me is correct - basically there is no difference in sound from about 20% open all the way to 100%. There is a drastic difference however once the valve closes to 15% or less... here in the video you can hear, when the valve is open at only 5%, the engine sounds that remain at idle, and additionally you can also see that the exhaust smoke (it was really cold outside when I shot the video) diminishes as well.

Breaking News! NISMO Omori Factory to Develop a BCNR33 Demo Car

$
0
0
Ladies and Gentlemen, Friends and All R33 GT-R fans,

Something close to the unbelievable has happened... maybe all of our efforts and patience has paid off!?

So my friend Paul Miller told me that the latest GT-R Magazine (Vol 121, March 2015) was now on sale, with a BCNR33 on the cover.  Following what appears to be the general trend (or perhaps they are responsible for it?)  the magazine's recent focus up until now was the R32 and R34, and then when the R35 was released, a few successive issues on the R35, so naturally I haven't been a big reader lately. (Although, I will admit the magazine started in 1994 and thus covered the 32 and 33 in depth back then.)  Plus, all the products they feature for the cars all have the GT-R tax so that annoys me as well.


Needless to say, I was surprised that GT-R Magazine featured the R33 GT-R so prominently...and the title... "The Truth about the BCNR33: 20 Year Anniversary Special Project."

This issue features several stories on the development of the R33 GT-R, for example the goals of the engineering and design teams. I plan to scan in (and maybe translate or at least summarize) those pages later, but many of the photos are the same as can be found in the "I Love R33 GT-R" Mook from which I also sourced my research on how the R33 GT-R improved upon the R32 GT-R.

There are also some interviews from notable figures such as Niikura-san at Mine's, Mukai-san at HKS Kansai on what they think of the R33 GT-R, an editorial from racing driver (and test driver for the 400R) Takayuki Kinoshita, and reflections by R33/R34 chief product engineer Kozo Watanabe.  Also a spot light on current Nismo driver, Tsugio Matsuda who owns a red R33 GT-R, silver 400R, and just recently bought a white 260RS.

Anyway - what got me excited was the following article, and the topic of this post.  This news is too good to keep in Japanese only, so here is the article, found on page 38-41  (my rough translation of the article follows- also sorry for the iPhone photos, did not have time to properly scan):


Nismo Omori Factory 
BCNR33 20th Anniversary Project

Aiming for a 21st Century GT Car
Building the Supreme 33

Nismo Omori Factory has, in celebrating 20 years from the birth of the BCNR33 Skyline GT-R, begun work on a new project.  With the concept of a "Grand Touring Car," they will make a demo car from the ground up.  
This will be the first time ever Omori Factory tries this on a BCNR33.  
Also, it is rumored that it is possible a new 2.8L spec RB engine will be created. 
What kind of machine will this be? A magnificent project is now, beginning.

Article:
A new plan to celebrate its 20th anniversary; emphasis on "grand touring"

Nismo Omori Factory - the "head temple" of Nismo's direct sales pro-shops.  Omori Factory has now embarked on a new project for the BCNR33 Skyline GT-R, which has seen 20 years from its release.

Readers of this magazine should remember the BNR32 Skyline GT-R project we followed all last year. The theme of that project was, "by refreshing [Japan speak for rebuilding] the BNR32 demo car,  to return the knowledge gained in some form to owners." 

Specifically, the plan for the machine was "a grand touring car for adults" and so the demo car's track focused spec, was changed along with its rebuilding. Also, with Nissan Motor Company's complete support, they were able to conduct "chassis torsion rigidity tests" on the almost completely stripped down chassis.  By conducting a test that is normally done when the car is new, they were able to check the body rigidity.

What resulted from the above test was the "carbon aluminum honeycomb kit menu." By installing this they were successful in greatly improving the body rigidity, and racing driver Seiji Ara who test drove the car was shocked at the result.

Also, as a grand touring car emphasis was placed on quietness, which lead to the development of the "floor sound dampening kit menu." So this project can be said to have resulted in a "21st century BNR32" giving rise to a new direction for Nismo Omori Factory's second generation GT-R menus [Japan speak for a series of optional parts].

So, in the BCNR33's case, in what particular direction will this project take? Nismo Omori Factory's Mr. Yusuke Mori, who will be the key man for this project, says the following:

"We are not at the stage yet where we can talk about what we do in particular, but with respect to this BCNR33 as well, we will be completely rebuilding it, and checking on the supply of OEM parts.  Also with regards to the machine itself, we would like to aim for "adult grand touring car" like we did with the BNR32."

The BCNR33 has, amongst the second generation GT-Rs, superlative grand touring abilities. So this advantage will be improved upon. What kind of spec will a reborn "Heisei-era" grand tourismo be? We eagerly look forward to this.

On the other hand, the "coach" for this project, Nismo Omori Factory's Mr. Masao Sasaki, says this:

"When I transferred from the racing world to the business world, the BCNR33 was the most exciting. I was allowed to participate in parts development and testing as well as the 400R. There were so many new discoveries.  I still remember thinking "the huge difference between a racing car and a production car" for example on the weight of the drive shaft."

For this project, Omori Factory purchased a BCNR33 as the base (see details below). The enthusiasm for this was more than the usual.  Also this time, in addition to the rebuild they will be investing in a new engine. While still at the planning stage, at present time it is anticipated to have a capacity of 2.8L.

"As a grand touring car, we should at least have an engine with increased capacity, one that can go on long drives at high speed with ease.  We would like to aim for that kind of spec" says Morita.

When one thinks of a 2.8L BCNR33, we always envision the 400R, though?

"While the capacity would be the same as the 400R, this will have a different flavor from that machine. In any case, we would love to promote a new item to BCNR33 owners."


page 40:
Purchased a 33 as the base for the demo car. Begin development on a new engine!

To inaugurate this project, Nismo Omori Factory purchased a BCNR33.  This is the first BCNR33 demo car for Omori Factory since they opened in 1997.

The car chosen as a base for the demo car is a 1996 (chuki, Series 2) V-spec.  Color is the rare dark grey pearl (and the car's odometer shows 91,000 kms).   This is not a stock car, as it has an aftermarket engine oil cooler, coilover suspension and mufflers, etc.  On the day of the photoshoot, our first impression was "other than the body color, at first glance an ordinary BCNR33." Sasaki-san describes the story behind its purchase.

"We elaborately checked the condition of the under chassis, confirming there was no rust. It wasn't excessively tuned, and didn't look worn out; these criteria were also deciding factors."

The day of the photoshoot the engine had already been removed, and looking into the engine bay, we did not see any rust or evidence of a large accident.  As a foundation, this specimen is fantastic.

Sasaki-san, as the coach for the previous similar project, supported Morita-san who decided on the specifications and the actual construction.  Morita-san is actually a mechanic who knows how to "drive" having owned an ECR33 Skyline and then an M35 Stagea.  We can expect great things from his future activities.

So, what kind of schedule will be followed? Also, like in the BNR32's case, will a new menu (of parts) be created? Morita-san says:

"This time, we will work on the engine too, and so the work is anticipated to take longer than last time. While checking the availability of OEM parts, we are thinking about how to mix items we have already developed, with items that will have to be newly developed. We imagine a schedule where we are not rushed, and can take breaks and look back."

According to Morita-san, expected completion date would be fall of next year [this was at the time of the photo shoot so I think this means 2015? I will find out from Nismo...lol].  Of course, during this time not all work will be focused on the BCNR33, new items for the BNR32 and BNR34 will continue to be developed in parallel.  The (Nismo Omori Factory demo) BNR32 that we covered up until the last issue, still has to get its suspension sorted out.

The work that has been scheduled in the near future, will be a complete dismantling of the body, with a complete repaint.  The body color will be changed to the same as that on the BNR32 demo car, that is, the R35 OEM color of "dark metal grey." With this, all of Omori Factory's demo cars will be the same body color.  Lastly, Sasaki-san says:

"The BCNR33 has superior high speed capabilities, and is superior in space utility to the BNR32 and BNR34. It is a GT-R with extremely magnificent potential.  As Nismo Omori Factory, we are aiming to create a package that can be properly called a Grand Touring Car. In any case we will not likely have another large scale project like this for a while.  Please look forward to the result."

Finally - the BCNR33 Skyline GT-R 20th anniversary project has begun. Will the new engine's name be the "RB-X GT3" in homage to the 400R? Will the exterior be kept standard, or will it be outfitted with Nismo aero parts? Will there be new parts developed, like the "Carbon Aluminum Honeycomb Kit Menu"?  As GT-R Magazine we are all consumed with interest.  We plan on reporting, in parallel, the body rebuild along with the new engine development. Don't miss it!


Page 41:
The Theme of this Project is "Grand Touring Car"

The Chosen Base Car is a Series 2

First photo caption: The new demo car is a 1996, chu-ki (Series 2) V-Spec. Mr. Yusuke Morita, in charge of the project, said "before beginning work we test drove it and the condition was not bad."

Under the three photos: The interior, other than the HVAC controls having been moved, is mostly stock.  Amazingly, it has the optional knee pads. The odometer shows 91,000 kms, this appears to be actual. The above right photo shows the seat removed, but the floor is also very clean. Below the trunk, there was no rust apparent. The engine bay showed aftermarket air cleaners and an engine oil cooler that fits behind the center grill.

Bottom right two: The Key Men of this Project
(left) Nismo Omori Factory: Mr. Masao Sasaki.  Following the previous project, Sasaki-san again assumes the role of "coach" this time.  He will be the advisor for determining this project's concepts and the development of new products. He has special memories with regards to the BCNR33.

(right) Nismo Omori Factory: Mr. Yusuke Morita.  He is a Nismo Technical Master.  For this project, he will be in charge of deciding the specifications and doing the actual work. He has experience in heavy maintenance, including chassis rebuilding, on dozens of BCNR33s.

Bottom left, thin red frame:  Seat Covers for the BCNR33, expected sale date in mid February.
In addition to the seat covers now available for the BNR32, plans are to offer this for the BCNR33 as well. These will be designed to match the interior of the BCNR33.  Details in the next issue.

A Moment Of Silence...

$
0
0
This morning on Facebook I learned that one of the biggest fans of the R33 GT-R, Alexander Gorodji, had suddenly recently passed away.

Many of us, myself included, never had a chance to meet him in person, but his legacy will live on in this:


If you haven't read it yet, highly recommended. One of the few books/articles out there that doesn't denigrate the R33, or in fact any of the cars - it's written properly, meaning that it shows how awesome each of the GT-Rs were for their particular era.  Written by a true fan of all the cars, I think.

Sean Morris also has more information about Mr. Gorodji here.

Rest In Peace, fellow R33 Otaku.

I Had An Affair!! Ok not really but... (plus my driving impressions of a 34 GT-R)

$
0
0
So for the past few months, in addition to my R33 GT-R (on the other side of the center wall), I've had THIS:


Living in my garage.  No, I haven't decided I have a sudden need for an R34 GT-R; my friend Ross in Canada happened to buy a near pristine KR4 (same color as mine!) zenki (1999) BNR34 at auction (with only 20,000 kms!) and needed a place to store it during the snowy season in Canada.  He would then have the car shipped to him in March, to arrive just about now.

Naturally, as a GT-R fan I couldn't say no, plus I had that extra space doing nothing.

Here's a video shot by Derek Wheldon of Pacific Coast Imports, who did the actual buying of the car at auction for Arneja Trading, the agent who imported it into Canada for Ross.

First order of business once the car was in my hands was to take the car to RAPT to get it properly detailed, and those ugly foglights removed.  Kabe-san, giving the car a once over, believed the car's mileage to be genuine.  However, he postulated that the car must have been left outside for much of its life.  Clues to this included some hairline cracks in the paint, some discoloration spots UNDER the clear coat, etched in rain spots on the glass and flat surfaces, and a badly cracked old style Nismo sticker on the trunk (as seen in the video).

As many houses in Japan don't have enclosed garages, this wasn't necessarily a sign of abuse; in fact given that many Japanese live in apartments, outside uncovered parking isn't unusual. In any case, I was confident that Kabe-san could either fix or minimize the damage, and 72 hours after I dropped the car off, it looked like this:
Amazing what a professional detail can do!

Weird black spot under the clear coat.... at least this is on the bumper, easily resprayed (you can see Kabe-san's reflection!)

Note yes that there are still a few places where a respray will be needed, but to me a respray is cosmetic and takes nothing away from the mechanical condition of the car, which is what is most important.

Anyway, once I got the car back from RAPT, I ordered a car cover, and put the car away for a few months.

Meanwhile, Ross had found out that my friend Dino Dalle Carbonare was looking to sell his Mine's BNR34 titanium muffler and Mine's BNR34 carbon wing mirrors.   A negotiation ensued, a price was decided - and then someone (me) had the brilliant idea that, since I have a long running relationship  with Mine's - why not get Mine's to install those Mine's parts? Plus, do a once over mechanical inspection to ensure the car was in good shape.  So I called Mine's and arranged for a little visit to do all this in early March.

So the day we went to Mine's the skies were overcast and it was drizzling...
just my luck, as it hadn't been outside since the detail...

On the way I had to get some gas... and the tires felt a bit soft for some reason...
Arrival at Mine's...yes despite being Italian Dino was there EARLY and I was 30 minutes LATE...
Some good company... that NSX-R was awesome!
The car gets pulled into the Mine's garage. World famous Nakayama-san (center) is ready to go
Last shot of the RSR muffler,
shortly before it was yanked off to be replaced with Dino's old Mine's titanium unit
When all the parts were put on, and the car given a clean of health - of course we had to ensure that people knew that Mine's did the work:
Mine's Takayanagi-san putting on the sticker....Turns out the sticker on my car was never offered for sale publicly...
found only on certain cars like their demo cars and a few select customer cars!  yay!
OK - now for what people really want to know - my driving impressions.

First, it wasn't my car, so I wasn't going to go crazy with it (and, as Nakayama-san at Mine's pointed out later, the tires were hard and cracked... could they be the original OEM tires?!! I knew they felt funny).  Second, I only drove in the city and the expressway. Third, it's hard to compare this 34 with my car because my car is tuned up both in power and handling - however I have tried to compare to what I remember when I got my 33 back in 2005 when it was near stock.  Also, this 34 had an aftermarket exhaust and suspension, so that may also have affected my perceptions.

First, the good. The engine, given how little it's been used, absolutely purrs. But, I also believe that build quality must have been better, as my car's OEM engine, with only 50,000kms on it, was not as smooth.  Clearly, there is also more boost off the line, which makes the car feel more peppy? In any case the engine felt "just right" -not weak, not overly powerful - for the job.  And this could have been the gearing as well - in any case, the car felt very easy to drive.  Also, the body rigidity was clearly better (I think mostly from the extra rigidity in the C pillars/roof area), and yes the car does feel a bit smaller than the 33.  At expressway speeds, however, the 33 is a better drive - a bit more stable, although I think the 34's underbody aero does a lot to minimize the differences.  However, the 6 speed Getrag on the 34 sure is nice to have, as 6th acts as an overdrive to lower the RPMs at speed (and thus makes the engine and thus car a bit quieter).

Next, stuff that is not necessarily good and not necessarily bad.  I am not sure to what extent this is due to the narrow OEM tires, but the steering was extremely light, and also somewhat numb.  The car felt like a luxury sedan in that respect.  I definitely wanted more feedback, and would have preferred less power assist. But, it did make for extremely easy driving in the city.  So together with the gearing and the extra boost, Nissan DID manage to accomplish one of its goals, which was to make the car easier to drive than the 33, which was deemed fast enough.

Also, I liked the Multi Function Display - it was fun to fiddle with, but I am used to 3 gauges and so having only 2 there... but the ability to change the display is cool.  The MFD would probably be useful on the track, if it was preset to show the important stuff like oil temperature and boost.

yes, fun in the beginning but do I really need all that info?

Lastly, the bad.  For the price of the car, Nissan really cheaped out on the interior of the car. The car's interior is much more plasticky than the 33. Yes the 33 is plastic too so it must be a different type of plastic. The seat fabric too, even though the seats are desirable from the perspective of having two harness holes, the fabric itself felt cheaper vs the suede-like material in the 33.  Continuing on the interior - the gas level and engine temperature gauges in the gauge pod are huge, compared to the 33. Frankly they were distracting to me, I much prefer the cleaner 33 gauge pod (plus, the straight down and 90 degree needle positions on the 33 give that car character... in the 34 they are like just like any other car...)

Meh... just doesn't look as good, sorry. And does a stock 34 really rev up to 9000?

Subjective, I know, but somehow it just looks better

So there you have it - my impressions of the 34 vs the 33. Clearly, these cars are very similar - and it makes sense as the engine and chassis are fundamentally the same.  The differences, both good and bad, are minor, and nothing that money can't fix or improve.  Again it would have been nice to see the differences on the track but that wasn't going to happen, hence my picking on relatively superficial aspects of each car.  Hopefully sometime in the future I will be able to drive a 34 similarly tuned to the specifications of my car, so I can do a direct comparison!

In any case - a week after the Mine's visit the car was picked up to be put onto the ship. Thanks Ross for trusting me with your car - I certainly hope you enjoy it!
Still looking good for the trip overseas!
The Mine's Titanium Exhaust and decal look good!
I wonder what will end up in my garage next?

Update - Protection for the Series 3 Front Lip Spoiler

$
0
0
One of the biggest problems, actually, with the Series 3 R33 GT-R (vs. Series 1 and Series 2) is the longer front lip spoiler.  Yes, it looks great, but it scrapes everywhere! (and it doesn't do much until you hit expressway speeds too...)

This OEM piece is made of ABS plastic (and came unpainted in its original black color), so it will not crack when the inevitable scrape happens - and by the way most of the time it's in those vertical parking lots (common in Japan) which require you to drive up, up, up to a parking spot... and then down, down, down to exit, at relatively steep angles, where your spoiler kisses the ground each time the ramp transitions from angled to flat, usually as you turn a 90 degree corner.

Series 3 kept by Nissan, showing the larger front lip spoiler, black ABS plastic
(Note this car also has the optional and now rare oil cooler kit with extra ducting in front bumper)
As a result, I absolutely hate driving my car to go to places like IKEA or Costco, where the parking lots are designed to pack as many cars into a small area as possible (I would even prefer mechanized parking over this, but I don't see those often, and sometimes my car is deemed too low to park in those pallets too...argh).

Anyway, once I got my front lip spoiler painted, I decided to get more creative to protect it.  Previously, I had tried to install a (Nismo) rubber strip that ran all the way across, and when that quickly peeled off (despite being bolted and glued on), I then tried thin aluminum strips which I bolted and glued one.  These also came off, and even got caught up under the car, causing a scratching noise that resulted in some pedestrians pointing and staring...

In any case, I had given up on this kind of extra protection, when I had a brainstorm.   My most recent effort involves rubber stoppers and some stainless screws which I found at my local hardware store:

To summarize, I simply used the same mounting points for the front diffuser using the pre-existing holes in the lip spoiler.   At each point, I lined up a rubber stopper and used an extra long screw to use the pre-existing holes.  When done, the underside of the front lip ended up looking like this:


But this was back in October of 2013!  Quite frankly (and yes I don't drive this car that much) I had forgotten about these, although the couple of times I recall scraping the front, I remember thinking "I wonder how those rubber stoppers are working? Oh well..."

Today however, I had a chance to look underneath when doing a minor project (to be posted soon), and found this:

The lip spoiler still looks good (ok it's dirty) but these rubber pieces worked as designed!  That is, they sacrificed themselves by being the lowest point on the front lip, hitting the ground/road first, and obviously lifting the lip out of danger's way!

So yay! Finally something that works.  Oh, and as for what I was doing working on my car, check back in a few days...


Ok So I'm a Brand W**re

$
0
0
I'm not a very good photographer, nor have I ever claimed to be even half good.  But, once in a while the subject looks good and the lighting is perfect.

Like this, taken with my iPhone 6 last Sunday. Enjoy!


Duct Tape Time....

$
0
0
So it's true. Duct tape is perhaps man's second greatest invention, right after the wheel.

After my car was lowered, and especially after the installation of the Do-Luck roll center adjusters, I had noticed more rubbing by the front tires on the plastic inner fenders than usual.

This usually happens in tight quarters, making turns below speeds of 20kph. In other words, each time I leave my house in my neighborhood, I hear the awful sound of rubber against plastic (the fenders).

Anyway, last time I took the car out, I was surprised to see, that the front left wheel had worn though the "highest" point of the fender - revealing a 12mm bolt! This bolt holds the OEM blow off valve, or some part of it, in its position under the fuse box.


Obviously, not good. Rubbing up against plastic I could deal with, because the rubber tire isn't going to be damaged.  But now with a bolt sticking through, could this lead to damage to the tire?

In any case, I wasn't going to take any chances, so asked my Club R33 Facebook friends for some advice.  The ideas (all from first hand experience it seemed) ranged from taking off the fender liner and either removing the OEM blow off valve, or moving the BOV forward a few millimeters, to removing the bolt entirely, to replacing the bolt with a flat type bolt.

So last Sunday, as the weather was finally warm and it wasn't raining, I jacked up the car and removed both front wheels.

It had been such a long time since the last time I worked on the car, I had forgotten why the ramps were necessary....
Since "OCD" is my middle name...
On the left, clean wheel. On the right, a layer of brake dust. Yuck!
What I immediately realized that, in order to take off the front inner fender liner, I would have also remove my front diffuser, as well as the brake ducting, to access the bolts on the bottom.  So what I thought was going to be a simple 30 minute job was threatening to become a 3 hour task.

Feeling lazy, I decided instead that I would cut the plastic around the protruding bolt to see if I could see anything, maybe access the BOV that way.  At the same time, I started looking around the entire wheel well, and then discovered to my surprise that, not only had the tire worn out the plastic in front, but it had also rubbed through in 3 places BEHIND the tire as well.
The middle shows where the undercoating had worn through, showing the primer!

The left side tire, did not have the problem in front but had similar issues on the plastic behind it.  And, on both sides, the lower most tear on the rearside was because part of the chassis (maybe the chassis rail?) was behind the rubbed plastic, leading to the vertical crack seen here:


As for the bolt that started it all, I used my Dremel and cut a small square of plastic away, to reveal this:
Yes, not the smoothest of cuts but check out how much plastic underneath that
had already been worn down!

It appears that whatever it is bolted to, wasn't about to be easily manipulated through this square. So, recalling what Bobby Proctor of Zealou5 advised, I went out and got a flat headed bolt:
FYI, it's an "M8" size bolt
which then sits nice and flush, at least 5mm difference (no washers)!


Obviously, at this point I realized that the long term solution is either to remove the plastic liners, and bend back all the metal that is causing the plastic to wear, and the use a heat gun to mold the plastic out of the way of the tires - OR, it is possible that raising the car a few millimeters up front, would also accomplish the same thing without any metal bending.  I will have to consult Ito-san at Do-Luck about this next time I see him.

Anyway, until then, it was duct tape time.  So I first cleaned the plastic, then judiciously tapped up the torn plastic (both sides, outside and inside, and both front and back, left and right) using industrial strength duct tape, like this:


Of course, just leaving the tape as is after the repair is not aesthetically attractive, AND, we had the problem of where the undercoating had also been rubbed almost to the bare metal.  So, I sprayed these areas with some undercoat, in the hope and that it's better to lose undercoat first, then duct tape, THEN plastic. (so I forgot to take photos of how it looked AFTER I sprayed it.... sorry! Have to look closely to see the repair though!)

I also found that the lower most bolt of the fender liners was missing on both sides, so I went ahead and found bolts to replace those missing (this also cause the fender liners to stop flapping about so I'm happy).

In any case, while the car looks great with the lowered profile, I will have to figure out which permanent option is the better one, long term.  I haven't bothered taking the car for a drive yet as I'm sure the rubbing will continue so long as I don't do one of those two options. Stay tuned!

Well That Was Ridiculously Easy...Ohlins DFV Height Adjustment

$
0
0
So I'm quite embarrassed to reveal this, but up until now, despite having Ohlins DFV coil-overs front and rear(having graduated from Nismo S-Tunes), I had never really bothered to see whether I could adjust them, height-wise.

I simply figured that, whatever setting it was on was good enough - the car was set low to the ground and the handling and ride were pretty good.


Except of course for the fact that I'm always worried about scraping things with the front lip spoiler, not just during parking but also when driving over ruts and dips in the road.  That, and it turns out that the current location (after installation of the Do-Luck roll center adaptors which complement the full Nismo link set I have installed) of the tire/wheel versus the wheel housing was having adverse effects on the inner liner, as I posted last time.

So this upcoming week, it turns out I HAVE to drive to a location with such bad roads. Usually I train it up there to avoid this hassle but a late evening departure means that taking the train is a risky endeavor.  So, I was resigned to driving my car, when I realized that, with coilovers, I could try to see how much I could increase the height.

After digging out the Ohlins instruction manuals, their recommended set-up was to have the bottom of the fender arch, to the center of the wheel, measure 350mm (in front, 354mm in the rear).  This was on their test car which had a drop of 30mm front and rear. So I went out and measured and it turned out for my car, this distance was only 335mm-ish!  Further, for the front suspension, the Ohlins factory settings are 38mm between the lower bracket and the lock-nut (which sits right below the spring lower seat).  Finally, the manual instructions that plus or minus 15mm is allowed in terms of adjustment up or down. So, this means that I could at maximum have a distance of 53mm.
First order of business, to measure the existing height... 40mm!

So, blessed with another sunny Sunday, I jacked up the car and removed the front wheels to access.

I discovered that the fronts were only 2mm off from the Ohlins factory setting, at 40mm, both sides of course. So, I got out the wrenches that came with the DFVs and started twisting away...each one complete turn is only 1.5mm in height, and I ended up raising each side 12mm (1.2 cm) for a total height now of 52mm on both sides, so let's just say it wasn't a 5 minute job.

So added 120mm to the ride height... sounds like a lot?

But not a hard job, just took some time.  After I got the wheels back on and car lowered to the ground, it looked like the recommended distance of 350mm between wheel center and inner fender was achieved:

Since the Nismo links drop the ride height from standard by 35mm in front (and 30mm in rear), it appears that increasing the height on the coilovers from 40mm to 52mm (12mm), also gives the car about 12mm in height (measured from the center of the wheel to the fender) so the car is probably still about 23mm (2.3cm) lower than OEM. It certainly still looks that way.  Hopefully the 1.2cm makes a difference on the rubbing and scraping but I will report on that after my trip this week.

Obviously this photo was taken BEFORE I did the work but also before the roll center adaptors were installed.
This is how the car looks now!

Stay tuned!

HVAC Temperature Sensor - Remember to Clean It!

$
0
0
So while I had my dash apart for some mods (to be posted soon), in my haste to remove this big piece of trim:


I inadvertently bent the tab on the plastic piece that sits behind the grill here:


 and connects to this rubber tubing:


Not a big deal, as I figured it could be fixed with some epoxy.  So I unscrewed it from the trim piece, and happened to look inside, and found a small sensor fully covered in dust.  It reminded me of the  MAF sensors in the engine bay. I'm guessing this one helps the HVAC unit read the ambient temperature so as to be more accurate in its output, whether hot or cold.

I instinctively blew off the dust - this thing I've circled in red was fully covered in dust before I realized this might be an interesting blog post and took this photo:
I took the photo only AFTER I blew away most of the dust! It was fully covered!!
And then used some compressed air to get it as clean as possible:


I wonder how many R33 owners out there have stumbled upon this? In any case I'm hoping this results in a more responsive HVAC unit, especially this summer!

Update: Ohlins DFV Height Adjustment

$
0
0
So about a week ago, I raised the height of the front coilovers (Ohlins DFV) of the car, 1.2cm.

I hadn't had a chance to drive the car, until now... and I'm happy to report that, while it seems that some of the inner fender rubbing has been reduced (I sometimes hear a slight rubbing, and I am seeing the duct tape start getting worn off), more impressively, the car's ride has gotten better, even though I didn't touch any of the settings!

So even though I am one mm away from the maximum recommended height (at 52mm, up from 40mm), something went right - maybe the springs are working better with the lower half extended those 12mm...

The problem still remains, however, on how I will rectify the inner fender scraping problem. If there was nothing behind the plastic I could simply use a heat gun and reshape (which I might try in some places) but for those areas where the chassis might be exposed, not sure. 

In any case stay tuned... Tomorrow will post on something more interesting... 


LED Perfection Through Trial and Error

$
0
0
Given how more modern cars have nice, brightly lit (and even sometimes OLED based) gauge clusters, replacing the OEM incandescent light bulbs is a popular mod for these older Skylines.  It's easy and the difference is dramatic.

OEM bulbs on top, LEDs on bottom
(This photo and next two courtesy of the seller's Yahoo Auction page)
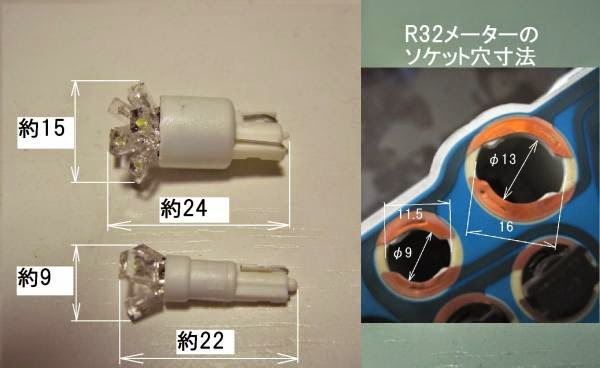
I can't remember exactly when I first replaced the OEM light bulbs in my car's gauge clusters for LEDs (maybe in 2009?), but I initially used these that I found on Yahoo Auctions, sold by a guy who apparently hand makes these very interesting LED bulbs:

T10 size for the main gauge bulbs, and T6.5 for the auxiliary bulbs
-this is for the R32 gauge panel but it's the same for the R3
He claimed that, as an R32 owner he had tried several different types of LEDs but was never satisfied with the brightness, so he fashioned his own.   I too was never able to find LEDs that looked like this, so I gave it a shot... and they were good, but I always wondered, could they be better?

Here is a better view of these "flower" LED bulbs - handcrafted mess?
So I did some research, and found the latest tech LEDs with labels such as "CREE" and "SMD" - and they usually listed wattage as well. These were widely acknowledged as much brighter than earlier  LEDs.  I mean, if you believe the hype, who wouldn't want more brightness, and more power??

From: http://item.rakuten.co.jp/mago1shop/lbh4-w/

Obviously, these seemed to be built in a proper factory, had higher wattage and were brighter and so while those "flower" bulbs I had gotten off of Yahoo Auctions were pretty good, I presumed that using higher tech, more powerful LEDs would result in an overall better experience.  So I went ahead and ordered a set of 5 bulbs for the main gauge cluster (T10 size).

I then went ahead and installed them, only to end up with this:
Can you see how some numbers don't look as bright as the others? Yes, I have OCD.
Incidentally, this photo was taken just last week, not at the time of the original install of the CREE LEDs
If you look at the photo, you can see how the "60,""80" and "160" seem to be dimmer than the other numbers - and indeed they are. The light dispersion simply isn't as good despite these newer type LEDs being supposedly brighter.  Also, I noticed that these LEDs actually run hotter as well.

The newer CREE SMD LED on the right (might be the 5050 chip type?)
Around the same time, I had gotten Robson Leather to work their carbon laying process on the standard plastic gauge surround.  It looks great... at least in daylight.

The end result:
Top is OEM, bottom is real carbon overlay by Robson.
Unfortunately, it turns out that at night, when backlit, the carbonized piece was letting some light through. There seemed to be some tiny pinholes - about 3 - which let in some light. Nothing major but enough to bother me (again, OCD).

However, as I almost never drive at night, yes it took me almost 3 years to get annoyed enough to decide to fix these problems.

First, I went and reinstalled the flower type LEDs:
Ahh, much better, all the lighting appears consistent
Second, I figured out that the pinholes in the carbon overlay that was letting light through, was likely due to process where Robson scrapes down the surface - as you can see in this photo from the backside and the yellow circle, if there are indents then scraping might result in the plastic being very thin or, perhaps even have pinholes.

Where I found some light leakage
The solution wasn't to paint it black, like I had postulated; rather, some black electrical tape did the trick.


But this wasn't all. While I had everything apart, I wondered whether it made sense to replace ALL the bulbs with LEDs.  In the end I decided that the warning lights, I could live with regular incandescent light bulbs. But, I decided I would try to see how LEDs would work on those lights which I use more frequently and thus, would want the LED's long life as well as brightness.

Unfortunately, the first experiment, using LEDs in the turn signal indication lights, did not go well:
LED on the left, and OEM bulb on the right.
I definitely prefer the look of the green arrow on the right, the left arrow actually looked blue! So LEDs don't work here.

On the other hand, the hi-beam indicator DID come out well:
Before, with OEM bulb
An LED. Much more crisp!
So now I have the main gauges with LEDs installed not just for the back lighting, but also for the high beam.

I also have done the HVAC panel, the defogger switch, and the hazard light switch, (I may not have blogged about this) however because there are no hot spot issues with those, I've left the LEDs in there alone.

So why am I doing this all of sudden? Stay tuned...

Some Rare MINE'S Parts! PLUS LEDs, continued...

$
0
0
Being that my car has a hand-built and tuned MINE'S engine with forged components (and not just a new engine installed by MINE'S... I HATE IT when people who've had only that done claim they have a "MINE'S built engine"... yes I'm petty but heck for what I paid!!!), I've been wanting to "improve" the rest of my car to match. To match the sticker on the rear end (which I found out recently, is not for retail sale from MINE'S).  That is, just looking at my car one cannot tell that it has anything that is MINE'S related installed, if the engine isn't visible. So time to change that.


Unfortunately, most parts that MINE'S once made for the 33 are no longer being sold.  Or, some of the parts they still offer for the Skyline GT-R, like the brakes and suspension... well let's just say they aren't as cutting edge as they could be. Tower bar, yes it's cool but the one I have is an original NISMO piece.

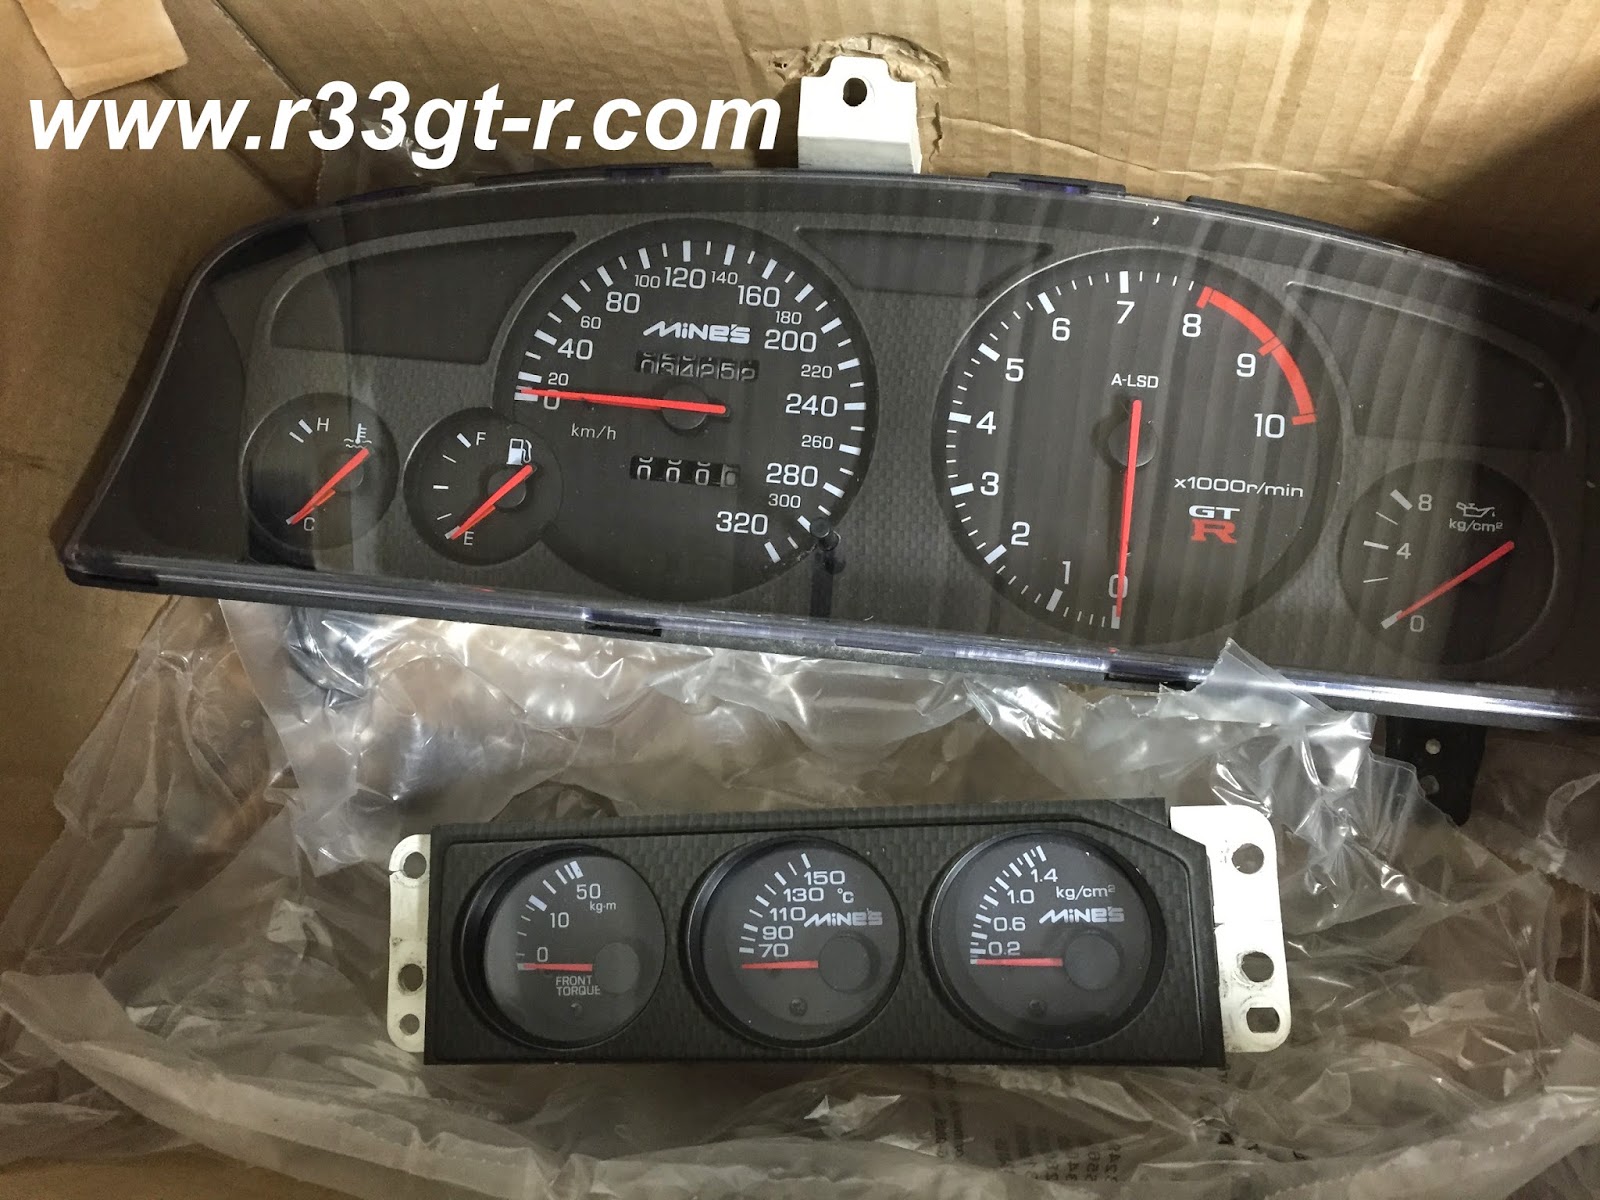
There ARE a few other items I'm still thinking about, but this post isn't about those.  Thanks to the power of the internet (specifically Facebook), late last year I stumbled upon someone in the UK who imports crashed cars for dismantling, and who was offering this for very reasonable money:

Sharp eyed readers will see that the front torque gauge is an OEM one
These two gauges are extremely rare - I've only seen them offered on Yahoo Auctions maybe twice the entire 8 years or so that I've been addicted to YA.  And, if I recall correctly, for insane money. So I quickly agreed to buy, used PayPal, and the package was on its way to me (it took a few nail-biting weeks, my thanks to the seller's patience when I messaged him every other day!) and I received it just about Christmas time.

First order of business was to have the odometer reading changed to match my car's. Not that it really matters too much (in Japan people DO take their cars to dealerships to receive a written work order showing when, and at what mileage, the odometers were swapped out) as I intend to keep the car, but in any case I wanted to have a seamless transition.

It took me a few months of research (ok I was lazy), but I finally found a guy that resets odometers to the mileage you want. I won't go into too much detail here, except to say that it works!

So I sent it out to him, and got it back two days later, and yes it looked perfect!


Alas, it wasn't as simple as this. I first had to remove the OEM speedometer from my gauge panel, then remove the MINE'S one from the gauge panel it came in, and swap them out. This is as easy as removing the clear plastic and carbon (or printed carbon) bezel, exposing the gauges fully, and then unscrewing 4 screws in the back.

That was easy enough, but then, when I plugged the gauge panel in, and turned the key - the speedo needle moved slowly up to indicate "40" even though we were not moving!  Damn, a problem...

Luckily for me, I found this this shop, DigitechProService, who after a phone call, told me to send the unit to them to see what they could do, but no guarantees. Seeing that I had no choice, I sent the MINE'S gauge cluster to them and waited.

Meanwhile, I went ahead and swapped out the NISMO sub gauges for MINE'S ones. Actually, upon closer inspection I realized that the front torque gauge was an OEM piece, not a MINE'S part.
We can see that the NISMO ones actually label what the gauge is for;
the MINE'S ones start and go higher (for temp) and are graded more finely (boost)
But, I had come too far to turn back. So I proceeded to disassemble both, to swap out the two Mine's gauges into the NISMO gauge cluster - you can see that the NISMO on top in the photo above is in much better shape. (one day, yes, I will have to find a MINE'S front torque gauge...)

This confirmed that the left most gauge was OEM. 

Three or four screws in the back, and each gauge falls out
Taking out the NISMO gauges to replace with the MINE'S ones was a bit disconcerting - would they work?

This was interesting - the NISMO sub gauge cluster uses stainless bolts, and the Mine's/OEM one uses brass bolts!
I put it all back together, and this was the result:
Not bad - not perfect, but will have to do for now

A few days later, I received the MINE'S main gauge panel back from DigitechProService.  I immediately replaced the OEM speedometer with the MINE'S one (mileage had gone up 28km but they had warned me that this would happen during testing - I actually drove my car around 25km earlier in the day so I am off by 3 km...I can live with this, I think).

A twist of the key and... PERFECT!!!
Further because I had previously (cite) replaced all the bulbs with the "flower" type LEDs, the lighting was also perfect; oh and yes no pinhole light leakage.

The end result:
The sub gauges look blurry but this is due to my iPhone's camera I think. I love this photo!
Ok so now I am almost done with MINE'S parts for my car - although yes can someone find me a MINE'S front torque gauge? LOL.

Anyone care to guess the one other last MINE'S part I am searching for? It's not the coil-overs, I am pretty sure the Ohlins DFVs I run now are better technology (although what do you all say?), and next time I get them rebuilt I might just have the spring rate increased to MINE'S spec, although I'm not convinced these are the best settings for a car that is mostly street/mountain driving.  Off to do some more hunting on Yahoo Auctions....

More Interior LED Improvements...

$
0
0
While swapping the LEDs in the gauges back to some unique handmade ones, I began wondering whether the LEDs I've had in the interior probably needed to be upgraded too.  I had long been suspicious about the Luxer1brand LEDs I installed for the interior center dome light (and the front spot lights) some time ago (can't recall but probably 2008ish?):

What the packaging looks like - I think the claims for 2-3x brighter than OEM are probably HIGHLY exaggerated...

This is what is used for the center dome light.  It's called a T10x31 LED... note the LEDs are essentially glued to a cut plastic form that fits into the dome light
Slick packaging, and although specifically tailored to fit certain cars (i.e. BNR32 and BCNR33 here), as I hadn't really done my research, and also because I bought this back when LEDs were first becoming a popular aftermarket mod, I was always suspicious as to whether these LEDs, although certainly WHITER/BLUER than the OEM bulb, were not as strong from a brightness (Lumens) standpoint. For example, reading maps and other text became harder at night...  It also appeared that, like I experienced with the gauges, there might be a problem with light dispersion?

Recently however I stumbled upon this from PIAA:
Their "Multi A"
These are supposedly a new type of LED - flat one piece, so thinner. These are called "COB" or "chip on board" LEDs which are supposedly brighter than SMDs.  Here is a link for more information about this type of relatively new LED.  Power consumption is 3W and a lumens rating of 170!  More importantly, the PIAA website showed that the OEM dome light is an 8W, 95 lumens bulb, so this means that this LED product should be almost twice as bright.  Further, they claim better light dispersion as well versus other LEDs.

And, as you can see, size-wise it's a bit smaller than the Luxer1 product:
Note: this photo was taken under the Luxer1 front spotlights...
The PIAA product comes with 3 types of adaptors (for T10, T10x31, and G14 bulbs), as well as some double sided tape to secure the LED board. I also like how the LED is embedded into a nice chromed aluminum form factor.

It's hard to tell from these photos, but here is how the Luxer1 product looks:
With the frosted cover on, hard to tell much...except it IS bluish...
With the cover off, you can see each individual LED

With the PIAAs, the LEDs were so bright that:
This was so bright it hurt my eyes.
The iPhone camera, however, by adjusting for the brightness, gives clues to the LED's construction
I could tell from the moment I plugged in the PIAAs, they lit up the entire cabin much more brightly than the Luxer1s.  Then, after I used some double stick tape and secured the PIAA unit to the dome light mount, and started testing the unit:

I also immediately realized that the PIAA's Kelvin rating, at 6000K, provides a much more natural light than the Luxer1s (which are more bluish, probably around 7000K).  This is because I still have Luxer1 units up front in the spotlights, and can compare the difference, not just in brightness but in color as well.  Also, the claims were true - this LED design DOES provide a wider, more disperse light.  You can see the color difference, as well as how the PIAA's light is more diffuse, in this photo:
Dome light on left, both spot lights turned on, on right.
I actually had only been planning to do the update for the center dome light, but I was impressed enough that I immediately ordered and then installed the "MultiD" version from the same PIAA series for the front spot lights:

The MultiD is rated at 104 lumens vs the OEM bulb's 75 lumens.
Like the MultiA, I love the form factor and the shiny aluminum construction:

Initially I was going to search for actual aircraft style spot lights that could replace this whole front lamp assembly, but then realized that it would be easier and cleaner to keep the housing but upgrade the LEDs.  Replacement was as simple as unplugging the old and plugging in the new:
Luxer1 on the left, the PIAAs on the right...
And, as the following pictures show, there was no need for a dedicated "spot lights" - these work just fine! Note that for all 4 photos that follow, the lighting used was as show in the above photo - that is, the Luxer1 LEDs were on the left side of the front light assembly and the PIAA was on the right; one was turned on while the other was off (in alternating fashion):

As illuminated by only the Luxer1s LEDs - this was taken at night, in my enclosed garage,
with all garage and other lighting, including the dome light, turned off - complete darkness
Illumination by only the PIAAs - same conditions, same camera!
As a friend jokingly remarked, it's like having daylight in your car! Just in case you thought the steering wheel comparison wasn't fair because the PIAAs on the right are closer to the wheel, check out the following.  Can't believe how dark the Luxer1s now appear...

before...

after (and wow you can see how dirty it is...)
So this mod is highly recommended, if you want to use LED lighting (too bad I don't get paid by PIAA lol).  Not only does the PIAA throw off close to twice the OEM light, compared to at least the previous LED product, the output is noticeably brighter, wider and more natural in terms of the color.  Although, I DID notice that the PIAAs actually run HOT if left on for a while, unlike the Luxer1s.

This is fun! I think I will tinker with LEDs a bit more in the future... stay tuned.

NOVUS For The Win!

$
0
0
From: http://www.novuspolish.com/fine_scratch_remover.html

So during my speedometer replacement and LED experiments, one thing I noticed was the scratches that had accumulated on the clear plastic of the gauge panels.  Like anything, I didn't care until I really took note, but once noticed, I decided I had to do something, otherwise just knowing that these scratches exist, would drive me crazy.  Again, yes my OCD in action.

I was tempted to use some toothpaste to try to see if I could fix the scratches for free, but decided based on research to try some NOVUS #2 (Fine Scratch Remover).  Everything I read, however, indicated that a lot of elbow grease/sweat equity would be required for good results.

Here is the boost gauge, before:


And here is the boost gauge, after. There is actually a semi-circular scratch that one cannot see once the front fascia is attached, but even that got reduced.  But yes, lots of elbow grease was required to remove most of these scratches.

Note that this is STILL a continuing process, every time I have the dash apart
I will continue to polish until even more of these scratches are gone!

But well worth it, I think? Or is there something better out there?

I also did the main gauge cluster, but the scratches were not that noticeable to begin with, so the before and after effects are not as dramatic as above and thus I'm not going to waste any bandwidth here on that.

In any case - something to look into if you have some unsightly scratched plastics!  Especially as most of us are now stuck with buying used parts....


Road Warrior Plus Product Review and Washing Cars in Japan

$
0
0
This post was long in the making, as I had originally intended to try the Road Warrior Plus ("RWP")product for a few weeks back in September 2013, and then report on its efficacy.  Flash forward a couple years now....

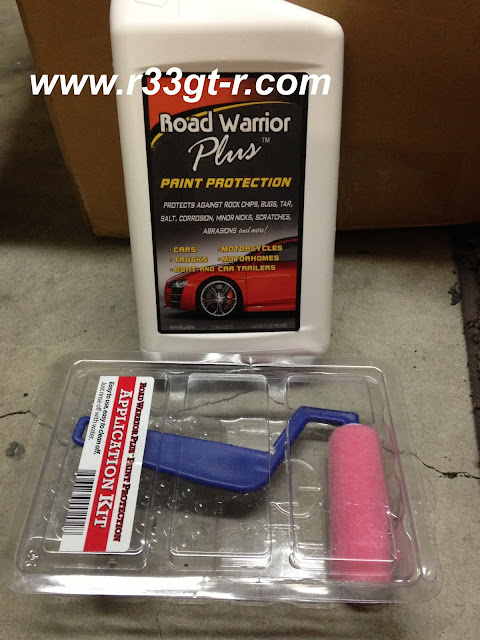
First, let me explain what RWP is.  Basically, it's a user applicable, TEMPORARY clear bra (mask) product for vehicles.
The kit I ordered came in a bottle as well as a tray and application roller

The product was developed really as a way for people with pristine show cars/motorcycles to be able to travel a long distance, for example to a car show, and upon arrival, simply peel off the protection.  In other words, on the way to the destination, a vehicle would end up covered in dirt, dust, bugs, making cleanup a hassle.  Rather than water and some bug remover, this product allows one to simply peel off all of the dirt and grime, exposing the still pristine paint underneath.

Because no one out there seems to make a pre-cut kit for DIY clear bra application for the R33 GT-R (believe me I've searched), and because a custom job doesn't make sense for me because the hood (bonnet) and bumper has some minor scratches that need to be fixed first, I was looking for a cheaper, less permanent alternative. Which I think this is.

Application is simple, anyone who has been drafted into painting house walls will know what to do. That is:
Step 1 - Pour the paint into the tray:
Oh, and it smells JUST LIKE Elmer's White Glue (which we all used in elementary school)

Step 2 -

Apply with the roller
Step 3 - Can you ever put it on too thick?

Answer: not really, just smooth it out with the roller

Step 4 - for testing purposes, I applied RWP to the entire front bumper, the passenger wing mirror, and the front lip spoiler. Let dry to get:

You can see the slight orange peel effect... but now you are protected!

So here is my honest review.  Because the RWP is meant to be temporary, it is clearly not as durable as a traditional clear bra.  Also, because the material is water based (I really think it might be Elmer's glue?) when it rains, the water will temporary turn the RWP white where it hits. Not exactly pretty, but when it dries the white patches clear up.

On the other hand, I'm pretty sure my liberal application of the RWP on the front lip spoiler saved it from some impacts, even with gravel/large insects, etc.

Also, if you have annoying friends who like to tease you for your OCD, they may start peeling it away without your permission - in fact this is what led to me taking the RWP off the other day.

After having working on raising my car height as well as the semi-succesful duct tape experiment, it was starting to bother me, how dirty I found the car's undercarriage.  Especially after some other R33 GT-R Facebook friends were showing off pristine under sides of their cars.

So off to the local car wash, for the only purpose of spraying and cleaning the underside:
And yes, the red bucket is mine, I brought along my own Zaino car soap, just in case

Incidentally, in Japan, the world's most vending machine infused society, yes there is a vending machine at public car washes with everything you need to wash, dry, and wax your car:

Do NOT drink that...wax...
Anyway, as I was using the high pressure spray, I accidentally hit the SAME SPOT where my "friend" Dino (noted motor journalist who has an intense jealously because of how clean my car is, compared to his - I guess...) had peeled some RWB off. This caused water to get underneath the rest of the RWB, and the effect was:

So the RWB just peels off...

So I peeled off the rest of the RWB, then drove home, where I finished washing the car, properly.

My next investment may be an air blower so I can blow dry my car....
In conclusion - try the product if you are curious. It's cheap, easy to apply/hard to screw up, and on my car, lasted 18 months! (ok I don't drive that much but still).   While I applied with a roller, I wonder what would happen if you had a sprayer and sprayed it on? Would it come out clear?

I actually DO have another product that is similar but more durable which I hope to test soon.

Until next time...

Some MINE'S Trivia (Part 1)

$
0
0
Having a well known MINE'S tuned car means people contact you to ask questions about their products.  Often, I can answer, but there are times when a call to MINE'S is required.

Recently a Facebook friend asked me a question - one that I had heard before but had repeatedly ignored. The question is - "if I have a used MINE'S VX-ROM, can MINE's tell me what spec engine this particular MINE'S VX-ROM is designed for?" He even sent me these photos of a used VX-ROM he was looking at.

Looks like it's all sealed still...

Both photos courtesy of Fabian Zeller

The answer is - maybe, but probably not worth the effort.

First, it looks like MINE'S has also heard this question too many times - I found the following explanation on their English website:

"Q: I have a Mine's VX-ROM. And the plaque has a serial number on it. Can you tell me its tuning contents through this number?

A: We can not tell you its tuning specs only by this serial number.   If you give us its numbers and letters on either side of VX-ROM through email with attached photos, we could give you some information such as its maximum boost pressure, Speed Limiter, vehicle year and etc...If you are in Japan and send us your VX-ROM, we can check it, confirm its tuning specs, and send it back to your own expense."

Sounds promising, except that knowing MINE'S and how conservative they are in their approach to tuning cars,  I would think that, for RB26 GT-Rs, maximum boost pressure is 1.0kg (just in case you are still running the ceramic, prone to shatter above 1.0kg, OEM turbos), removing the speed limiters is a no brainer, and vehicle year... well not sure but since each VX-ROM is vehicle specific and each RB GT-R didn't really change that much within each generation, not sure how useful the year of the vehicle will be to you.

In any case, I was on the phone with them concerning my MINE'S gauges (see Part 2 - coming soon!) so I went ahead and tried to get more information about how one could get more information about a VX-ROM one picks up used somewhere.

This is what Takayanagi-san at MINE'S told me - All VX-ROMs have a basic map which improves upon the OEM ECU.  That is, it removes the speed limiter (all JDM cars used to have a speed limiter that kicked in at 118kph), raises boost to 1.0 kg, increases the rev limit, optimizes fuel management, and optimizes spark timing management. Just like it says here.  All this alone is good, however it turns out that Mine's can/will tweak each VX-ROM to fit the particular spec of each car, when you first buy the VX-ROM new.   So when buying a used VX-ROM, you should try to make sure that it fits your engine spec.  

Looking at photos like this, you would think one could call Mine's, give them the serial number found on the VX-ROM, they could look up the data, and all such particulars would be given to you.

Unfortunately, for whatever reason, Takayanagi-san claimed that the serial number alone would not suffice, that in fact, each unit would have to be opened up to see what the spec was. He also told me they would not look at any VX-ROM for which the seals were tampered with, as they would have no idea what had happened to that unit.

Actually, from a business perspective, this makes total sense.  Why spend time and energy researching something for someone who doesn't buy from you? I suspect that if you WERE to walk/send a used VX-ROM unit to MINE'S, there would be a small fee involved...anyone have any experience in doing this?

Some MINE'S Trivia (Part 2)

$
0
0
Recently, I called MINE'S in an effort to get more information about the MINE'S sub gauges - I wanted to know more about their development.  Because I didn't have a torque meter gauge (and because Takayanagi-san's memory of whether they even made one was fuzzy), we talked only about the boost gauge and the oil temp gauges.

You can see them compared to each other here:


First, the oil temperature gauge.  I asked why the number range was different. Was this because MINE'S tuned cars run hotter, for example?  It turns out that the reason is actually a very practical one. The OEM oil temperature sensor is not very accurate.  However, it is most accurate in the higher temperature ranges, up to 150 degrees C.  Thus, the thinking at MINE'S was to simply have the gauge  cover those more accurate areas.  Actually, if you take a look at the OEM gauges (below) you can see that the OEM oil temperature gauge maxes out at 150 degrees C.  So while I haven't talked to NISMO about their scaling, I presume they simply didn't want people thinking it was acceptable to reach 150 degrees.  Different philosophies - be more accurate, or have a built in safety margin.

Second, the boost gauge:  The biggest difference here obviously is how the MINE'S gauge STARTS at 0 kg/cm2, unlike the NISMO one, which reads BELOW 0 when the car is not moving/turbos not spooling.

The NISMO one thus indicates negative pressure, which, if you recall is clearly shown on the OEM gauge:

So when driving around town, the lack of a needle moving on the boost gauge is actually quite disconcerting, because throughout my GT-R ownership, I guess seeing that needle move has become ingrained.

So I think I will keep both the MINE'S gauges for a while.  I suspect like most people, I don't really use the gauges except for the occasional glance, plus the bling is nice. I don't expect any greater accuracy (because I'd be in big trouble if the engine temperature gets up to 150) so for now I'll consider this a cosmetic mod. I DO miss the boost gauge's negative boost movement so we will see about whether I change back to the NISMO one at some point.

And speaking of some cosmetics, I have a couple of projects in mind....
Viewing all 336 articles
Browse latest View live