Quantcast
Channel: One Man's Lonely Adventures In His R33 Skyline GT-R
Viewing all 336 articles
Browse latest View live

Another Modern Upgrade.... Wiper Blades

$
0
0
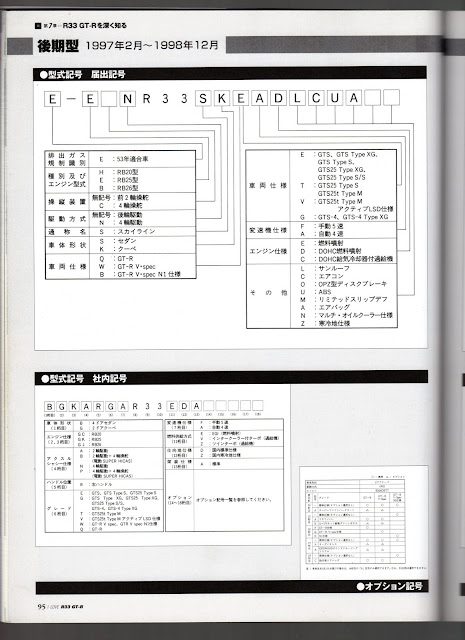
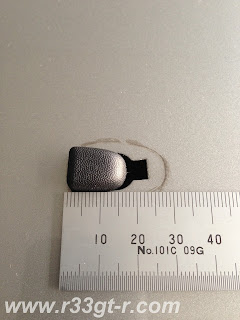
Well with this recent cold weather, I'm not too inclined to go out and work on the car. However, last time I washed my car (after the visit to Midori Seibi and Do-Luck) I noticed that the wiper blades on my car, were a bit dodgy in that the metal ribs that run along the sides of the rubber blade itself were working themselves loose. This would then cause the blade itself to come loose from the frame. Like this:
 So even though I don't drive much, if at all, in the rain (basically unless I get caught on the way home), I was worried that, if for some reason I had to use the wipers, then Murphy's law would mean that the rubber blade would slip, and then then metal frame would scratch the glass (and numerous attempts to fix this problem by forcing the metal rib back into the rubber had not been successful). So I had to figure out a way to fix this problem.
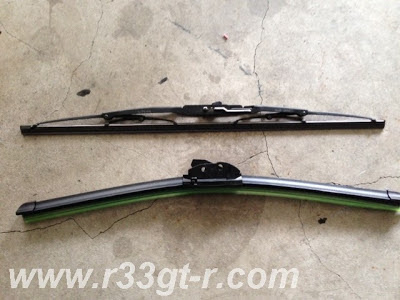
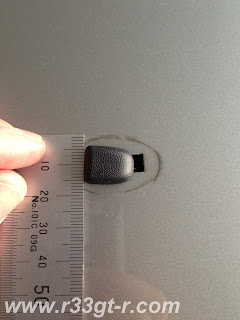
Solution:

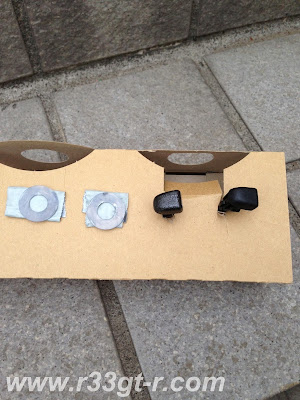
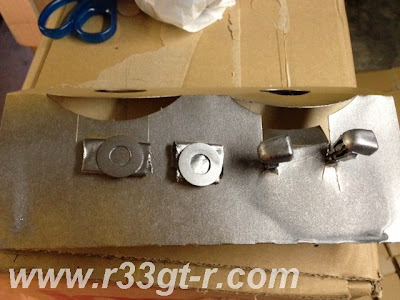
There seem to be several brands of these new one piece wipers that replace the frame and fit the car. But (at least here in Japan) Bosch seemed to be the only one that had a specific listing for my car, and had items that reflected the different sizes left and right, for their top of the line Aerotwin wipers. Plus of course the aerodynamic nature of these wipers was cool, especially as the OEM driver's side blade frame has a small built in spoiler just for that purpose (to prevent the wiper from lifting off at speed). The design also promises more evenly spread out wiping ability, and the rubber blade itself is easy to replace.

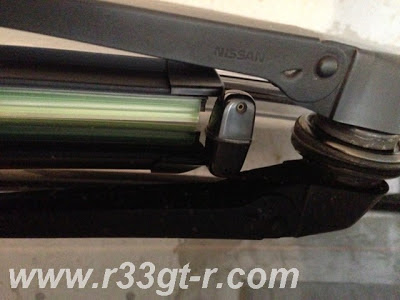
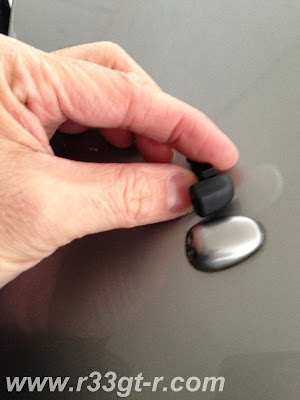
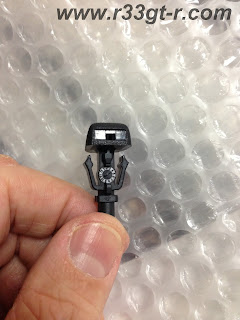
These are an easy install, they come with an adaptor (Bosch calls it "Quick-Clip") that allows retrofitting to most cars by attachment to the U-shaped wiper arm end. However, here is a tip for our cars - the instructions state that the cover can be opened up to let the U arm fit over the internal clip - this is not true on our cars. Due to the curved nature of the wiper arm, the covers have to be gently forced off (after insertion of the arm), then the U hooks over the clip, then the cover can be snapped back into place. Like so:

I was also going to take this opportunity to re-paint the wiper arms, as the original flat black paint had been rubbed off in some spots - except it's just too cold and I wasn't about to start spraying black paint in an enclosed garage... so that small project will have to wait for warm weather.

Anyway - here is a before picture with the OEM blades (excuse the mess in the garage...):

And here it is, after fitment of the BOSCH wipers:

So what do people think of how they look on the car... a bit too modern perhaps? OR subtle enough that it works? I'm sure their superior performance alone justifies them, but in my opinion they just look a bit weird...the OEM mini spoiler was actually kind of cool.  Also, I wish there was a way to keep them half hidden under the hood.

Oh, and what should I do with the rear wiper? Same thing? The question here is, does it need to be aerodynamic in nature as well?


A Quick Visit to RAPT Again

$
0
0
So why am I here today? The truth is, I needed an excuse to take my car out, get the engine warmed up as I am going to do an oil change in my garage later today. At the same time, made some inquiries about some interior detailing I may have done... Stay tuned for why!

Ok, ok... actually the real reason is so I can test out the Blogger App for the iPhone. Works well I think!

The BEST NISMO Parts Catalog?

$
0
0
So in my quest to find all catalogs relating to the R33 GT-R, I recently found this:


At first, I wasn't too excited. But then I realized that this catalog was published after the 1997 Series 3 cars came out. Honestly I wasn't expecting anything new, as NISMO tends to upgrade their product offerings very slowly.  But one page grabbed my attention (click HERE to see all the pages).


First, I had no idea that NISMO had offered a gauge panel for the glove box, as above.  However, I'm not a big fan of driving around with my glovebox open, so this was interesting but probably not something I would buy even if I came across it somewhere (if they even exist now?).

The "Navi In Multi Meter" I have seen before on Yahoo Auctions. Tempting, except that the this instrument panel is not exclusive to the GT-Rs and so it doesn't have the GT-R logo, for one. Also, GT-R nerds like me, appreciate how the speedometer needle is horizontal at rest, and the tach needle points straight down. Plus, the redline of the tach is at 7000rpm, and you lose the oil pressure gauge. Again not designed for the GT-R. Too bad.

But, what I DO want - one is the carbon fiber seat belt guide - the insert that fits into the hole in the middle of the seat back - through which I pass my racing harness on track days. I always worried that the harness would wear out the material there, and was looking for a solution - well it turned out that NISMO had one, many years ago.... (BTW, have no idea how this "Type R" seat is different from the stock item...)

And finally that cool aluminum billet seat reclining knob. A small dress up item, but it would definitely add to the stark interior.

Anyway - if anyone ever comes across these bits, let me know please! I may even pay a finder's fee for them...

So here is the back cover of the catalog - one of my favorite shots, it really differentiates the Series 3 from the other other R33 GT-Rs.


How to Decipher the R33 Chassis Code

$
0
0
Ok so I have been meaning to share this for quite a while now...

So if you look at the blue VIN plate on the le2ft hand (facing the car) side of the engine bulkhead, there are two long alphanumeric codes. The one on top is the "chassis number" (which has "BCNR33-0XXXXX" - showing the actual "serial number" (ie its unique ID, numbered according to what series car it is) and the one below that, the "model number" - which is a few digits longer, and starts with a "GG."

So I'm sure many of us have wondered, what kind of data do these codes reveal?  Well, flipping through the "I Love R33 GT-R Book" I noticed that they provided a full explanation! Well, at least for the "model number."   Ok, but this is in Japanese...

Note that this is also only for the Kouki (Series 3) model - the others had some slight variations.

So, I know it's a bit hard to read, but I overlaid an English translation for everyone. (click on the photo below, then click again for the maximum enlargement)


And actually - it's the bottom half of the page which is useful if you are looking at the blue plate in the engine bay... the top code is what is used to register the car with the Japanese authorities, so would be listed in the car's Shaken-sho. What's most interesting are the options (the few) that were available for the car (the small box to the right on the bottom). A KENWOOD Sound Cruising System, anyone?


Another Modern Upgrade - "Fluidic" Windshield Washer Nozzles!

$
0
0
Ok - time for a proper parts mod post! Apologies to all for not being a bit more active on this, life is busier than usual right now....

Anyway, another modern upgrade – "Fluidic" windshield washer nozzles!  Thanks to reader Matt for giving me this idea (he left a comment when I modernized my wipers)

Who knew that technology had improved something as innocuous as the washer nozzle!  The standard piece looks like this (shown against the unpainted fluidic nozzle):

on par for what was normal in the late 1990s.  However, it turns out that a US company, Bowles Fluidics Corporation, had developed a new line of“fluidic” nozzles–which due to their different design, are able to more effectively and efficiently apply washer fluid to the windshield (less spray, more coverage, etc.) – and thus rapidly became the OEM choice.  Compared to the traditional single or double stream nozzles, these fluidic nozzles generate a wide, disbursed spray, covering more area with less fluid and hence reducing waste.


Here is video to compare the two types.
Standard:


Fluidics:

Unfortunately, these nozzles did not become standard equipment in Nissan vehicles until around the 2004 model year, and then did so in the US truck range first, apparently (anyone know?). In doing some research, however, I found out that the latest generation Versa (known in Japan and some other countries as the Tiida) had these nozzles as standard equipment.  And, based on the hope/premise that vehicle manufacturers would not radically change the foot print of the nozzle shape (as these Mazda RX-7 enthusiasts discovered), I took the plunge and ordered a left and right set for the 2008 Titan (USDM). (same number for Infiniti, Armada truck, etc.)

The part numbers are: 28931-7S000 (LH) and 28930-7S000 (RH):

Unfortunately, once I received them, I discovered that these new nozzles are MUCH smaller than the OEM ones... hmm, what to do? They DO work with the housing, and with the pump, as seen in the above videos. But check out these photos:
 

Well, while I search for fluidic nozzles that are larger, I decided to get creative with what I have.

First, I went to the local hardware store and picked up some 22mm diameter nylon washers:

These fit perfectly! However, even when installed, things were a bit loose, so I decided to use 0.5mm rubber, cut to shape and size, below the nylon washer as "fill." (and it means the washer won't move, either!).
These nozzles and the washers are unpainted, so I first had to paint with some KR4 spray paint. I used a piece of spare cardboard, made a jib, and then spray painted away...


Before:

After:

(unfortunately you can see that one nozzle didn't turn out as good as it could have - because I had tried to manually, not spray paint before giving up and spray painting... oh well...)

I test fitted one side, and here is how it looks from a bit away:

Not bad if I may say so myself - you have to know what you are looking for (see the OEM on the right?)

As a note – these only cost me around $3 each. Not sure why the 2012 model ones for the Versa (which I was originally interested in) cost more than $20 each. Maybe they are larger? Will have to check next time I'm at a dealership...

Also, there is something that CLAIMS to be similar, but it is not.
this uses a different technology, yet is much more expensive than my $3 pieces…so for now, I am mildly satisfied... I'll be 100% happy if I can find a fluidic nozzle that fits the OEM hole perfectly... If anyone out there knows, please leave a comment and tell me!!


R33 GT-R Aerodynamics, Part 1

$
0
0
An Interview with Aerodynamicist Andrew Brilliant

So it turns out I’m lucky enough to live literally down the street, here in Yokohama, from fellow American and Cal graduateAndrew Brilliant, who is an up-and-coming racing car aerodynamicist /engineer. His work includes the Under Suzuki S15 (record lap setter at Tsukuba) and the NEMO Evo (record holder at WTAC),both featured recently on Speedhunters as well as otherinterviews.  Back in the US, he also became well known for his work on his ownMitsubishi Eclipse which he modified using aero techniques, which helped it become one of the fastest tuned FWD cars out there.

Here is Andrew on the right, with Ian Baker in the center, directly across from  Dino Dalle Carbonare of Speedhunters
See original source article at MotoIQ.com (thanks!)
Anyway, it’s clear the guy is a gearhead who not only knows, understands and applies aerodynamic theory and techniques not only to his own car (making it one of the fastest and most aerodynamic Eclipse race cars ever), but someone who is expert enough to be successfullymake a living in this area, various racing cars to his credit (making them so good aerodynamically that he’s had the rules changed on him… on more than one occasion).

So this past Sunday, Andrew was kind enough to drop by my garage for a couple of hours and give me not only a quick education on aerodynamics, but also point out the good and bad of the R33’s aerodynamics, and give me some ideas on how I can improve my own car’s aerodynamics.  Of course, some of his ideas are a bit too extreme, more applicable for race cars than for road cars, so the extent to which I will be able to modify my car, if any, will be limited.  Nevertheless, worth trying I think!


There is generally a misconception as to what constitutes good aerodynamics on a car. For example, manufacturers chase low Cd numbers, and while this may be important in a mass market car where improved fuel economy is the goal, on a racing car, while drag numbers are important, downforce (or negative lift) is just as, if not more, important.   Having sufficient downforce means the car’s tires stick to the ground better, resulting in better acceleration, handling and braking.  More downforce on the front end of the car only, for example, will reduce oversteer.  The other way to get more traction would be by increased vehicle weight, which then requires more engine power, reduces gas mileage, etc.  So aerodynamically generated downforce is definitely the way to go, as this article explains.
http://www.racecar-engineering.com/technology-explained/diffusers-engineering-basics-aerodynamics/
Unfortunately, the usual downforce devices also generate drag, so a balance must be struck.  
Speaking of drag, it turns out that the Cd is not the only drag number at play – the frontal area of the car is also important.  Both numbers should be minimized in order to reduce the total amount of drag on a car.  The best car Andrew’s seen in terms of total drag force is the Honda NSX – small frontal area and low Cd number.  Unfortunately, the frontal area cannot easily be changed without basically redesigning the whole car, obviously.  So with respect to my car, my emphasis will be on improving downforce.  


Aero Devices: A Quick Summary (not complete of course):
Spoilers -  what is on the rear of my car is a “wing” and not a “spoiler.”  This may sound obvious but many people mix this up. And, it turns out that the term “spoiler” came from the concept of a “lift spoiler” – in other words, the device was originally designed to eliminate lift on a vehicle or wing, where you might normally have lift.
This R32 GT-R has BOTH a spoiler (lower) and wing (upper).
From http://www.gtr.co.uk/forum/143361-gt-r32-nismo-drag-spoiler-weight.html
Wing - A wing on the other hand is more efficient than a spoiler – it’s basically the most efficient aerodynamic shape. A string, for example, 1/10th the size of the wing, has MORE drag than that spoiler, so when people use wire to support various parts on a car, they are actually creating more drag…  Wings and spoilers, however, are usually found on the rear of cars, and so this is only really good for generating downforce on the rear of the car.

Canards - According to Andrew, he would have to see what’s out there for the R33, but most of the designs he sees appear to be copies of Super GT stuff.  However, canards are all are very design specific – i.e. every bumper is different, and so there is no such thing as a “universal” canard.  There are explanations out there as to whether carnards are down force producers or vortex generators, but either way, their use is controversial.
http://www.modified.com/tech/0610sccp_automotive_aerodynamics_part_2/viewall.html


Diffusers - A diffuser is basically an expander – it takes a flow of air and expands it to a larger volume of air.  This works due to simple physics (conservation of area – increase the velocity, trade off somewhere else) - because you have ambient air pressure behind the car, higher air pressure in front of the car, and then the air, flowing from a larger front area to the rear via a constricted area (the diffuser), the air will have to travel faster in the constricted area, thus reducing the air pressure! This reduced air pressure creates negative lift, or downforce.  
http://www.racecar-engineering.com/technology-explained/diffusers-engineering-basics-aerodynamics/


What about theR34 rear diffuser? Andrew opined that its benefit is mostly to reduce drag and maybe produce some downforce, and of course there is the nice side effect in noise reduction.  This makes sense to me, as anyone can see that air passing under the car would otherwise get caught against the bumper.
from: http://www.gtr.co.uk/forum/108359-r34gtr-rear-diffuser-oem-vspec.html
Flat bottoms:  People may think that flat bottoms contribute greatly to aerodynamics, but according to Andrew, in racing at least, the rule mandating flat bottoms was developed in order to equalize the playing field for all aerodynamicists.  On a road car, however, it is hard to justify the expense, cost and weight in that, a major problem is that such a device may prevent proper cooling of the gearbox and exhaust. We therefore did not spend much time discussing this (even though secretly I think I want to experiment with this...)
http://www.1addicts.com/forums/showthread.php?t=795049

Side Skirts:  the primary purpose of these is to create a low pressure area under the car, mainly by directing the flow of air to the rear diffuser, if any, as well as to prevent ambient (and thus higher pressure) air from interfering with the air under the car (which should ideally be lower pressure).

So that’s quite a bit of reading for today… tomorrow, will post up specifics on the R33 and a short analysis of what I can do to improve my car…

Here is a sneak preview of Andrew "working some magic" on my car to make it more aerodynamically efficient...


R33 GT-R Aerodynamics, Part 2

$
0
0
So picking up where we left off yesterday:

So, given our discussion on aerodynamics, I asked Andrew Brilliant, my neighbor and world reknown aerodynamicist, what’s good and bad on the R33 GT-R?

What’s good is that Nissan and other Japanese manufacturers in the 90s actually exerted effort in putting their cars through aerodynamic development, trying to reduce drag and increase downforce.
Wind tunnel testing during R33 development.
From "All About the New Skyline GT-R" published on February 18, 1995 by Motorfan when the R33 GT-R was released .
As a result, the 33’s rear spoiler produces more downforce at the full down setting than the R35!  However, the R35 is NZL (near zero lift), while the R33 has positive lift on the front.


Rear Spoiler Angle and Aerodynamics:
Spoiler Angle/ CD / CLF / CLR
0 degrees    / 0.35 / 0.09 / -0.03
6 degrees   / 0.36 / 0.10 / -0.07
12 degrees/  0.37 / 0.10 / -0.10
18 degrees/ 0.39 / 0.10 / -0.14

CD = Coefficient of Drag; CLF = Coefficient of Lift, Front; CLR = Coefficient of Lift; Rear
(source: "All About the New Skyline GT-R" by Motorfan)

Andrew believes this is most likely (and is expected in a road car) due to all the openings for cooling air, which have not been properly managed, as well as the leveraging effect from the rear wing.

So what’s clearly bad about the R33?  Well, for starters, it has a large frontal area. This translates into lots of drag even with a relatively low CD of 0.35. Of course, compared to the R35, its frontal area doesn't seem too bad...
http://www.gtr.co.uk/forum/146388-wich-skyline-gtr-rear-do-you-think-best-looking-11.html
Like its RB26 brothers, the R33 also has lots of intakes for the engine intercooler and radiator, as well as various other openings.  What this does, of course, is to increase the amount of air under the hood, but if the car doesn’t have a vented bonnet, then the only path for the air to flow out, would be under the car.

Well then, what about those bonnet spacers that raise the back of the bonnet? Do they work? The answer is a resounding “no”! And the reason for this is, because the windshield area is a high pressure area, so if the bonnet is raised, then air gets forced back INTO the engine bay. This might be good from a cooling perspective, but not an aerodynamics perspective. (note: recall those giant “cowl induction” hood scoops on American muscle cars – they face backward for this very reason!)

What about my car? There are various bits that I have added without really knowing what I was doing, and of course I have some future plans as well.
1.       For example, the aforementioned R34 rear diffuser appears to be a good idea – with a slight weight penalty, but it would clean up the rear of the car, reducing drag, maybe some additional downforce.

2.       Yahoo Auctions sourced rear carbon wing blade.  I’ve always been curious about this, because looks-wise it’s the same as the OEM wing, but it has this small upwards flap (aka Gurney flap) at the rear edge.  Good news, Andrew believes that this probably IS effective, and in fact, may even reduce drag a bit!

      Additionally, we discussed the Nismo 400R and BNR34 dual blade rear wings, and how they work. This may be a worthy upgrade in the future... 

3.       Wider rims and tires: Wheels are always a source of drag and lift according to Andrew, and not much can be done here except run skinnier tires and wheel caps (which then might lead to a brake cooling problem…I wonder though if there is anything that can be done here? Hmm....)

4.       Side skirt and Side vents.  Unfortunately for one of my planned projects, the conclusion here was to cap off the functional scoops on the Nismo side skirts.  To the extent that the Nismo side skirts extend to the ground lower than the stock ones, there is some effect.  However, unless I actually have a need to use the vents to cool the rear brakes, I was told it was better off capping off the scoops – because any time air is channeled somewhere, drag is created.   So first I will have to determine whether rear brake cooling is even needed (Andrew believes probably not), so I will have to experiment with this.
And I was SO looking forward to making this functional...
5.       As mentioned earlier, there is lots of air that gets trapped in the engine bay with no way out except down.  Whatever work the front and rear diffusers would do thus gets disrupted.  So I first need to figure out how much air is actually needed, then begin sealing up areas which lead to the air getting trapped, and guide the rest of the air to the cooling bits - the intercooler and the radiator.  This would mean removal of my front bumper, and then finding various places to seal off. Of course, the easiest solution is to install a vented bonnet, but of course that takes away from the OEM look of my car, hence I am resisting.
Andrew pointing out some of the spaces where air can enter and get trapped in the engine bay.
6.       Front bonnet lip. I actually have one, but have yet to install it (the idea of drilling holes in my stock bonnet…arggh).  This should work to improve the flow of air under the bonnet, but again, whether this is something to be done (see above) is questionable at this point.

7.       The HKS Kansai front diffuser:
http://www.kansaisv.co.jp/parts/public_stock_detail.php?entry=0021.dat&model=parts_6
      As long time readers know, I used to have this on my car, but took it off in favor of the current three piece from Silk Road.  I had always wondered about the theory behind that, as it seems counter to everything out there on aerodynamics.  Andrew believes that the hump in the middle is designed to collect a bubble of air which generates drag, but also causes a pitching movement which then helps push down on the front wheels and lift the rear which probably has more than enough downforce to begin with.  Makes sense, but apparently this was popular in the late 90s/early 2000s in Super GT, however there are now more efficient ways to generate even more front downforce.

Anyway - thanks to Andrew for the education! It seems there is a LOT I can do to improve the aerodynamics on my car - whether or not I actually do something about it, remains to be seen. Having lots of engine power is good, but the idea of using aerodynamic principles to get the car to stick to the ground better is very tempting...  


Here are some race car specific links that I came across in doing research for these last two posts, for those who may be interested:

Dealer Installation Recommended! (To avoid serious personal injury or property damage!!...)

$
0
0
So in addition to those "fluidic" nozzles, I ordered something else from the US at the same time (not wanting to pay more in postage than in parts!).

I was very concerned when I opened the package, however, and these instructions greeted me:
SERIOUS PERSONAL INJURY OF PROPERTY DAMAGE?????
Is this included in every part sold in the US, or just the potentially dangerous ones?  I guess this part COULD be potentially dangerous in the wrong hands... or MAYBE there is concerned that the Velcro (R) on the backside might not be good enough to mount this, meaning that during some aggressive driving, it could go flying about the car... unless installed by a pro....
Installation Expertise Required!
Then again, it could be the contents. Those scissors in the wrong hands, that might be deadly.
Deadly Contents!

 Yes folks, another modern touch:
Indispensable? A touch of luxury? 

The R33 GT-R didn't come with this, of course. But luxury cars (like Mercedes) do. So why not my car?

Now, where to mount it...

At first, I thought it would be a good idea to have it mounted here:
This cheap felt doesn't work too well with Velcro(R)....
But then realized that it would be a good idea to have the kit accessible when something happens IN the car, rather than having to stop the car to apply a bandage. Plus, the shape of the back board there, AND the material, was not as "Velcro(R) friendly" as it could have been.

So I ended up mounting it on the "carpet" between the two speakers on the rear parcel shelf, where it fits perfectly (although it would be cool to have this section indented and/or covered like the German cars...).   Oh well. Better than nothing, but I wonder if installation here might lead to "serious personal injury or property damage"??  Unlikely, I think as this "carpet" DOES NOT LET GO of VELCRO!!

Anyway, a somewhat of a flippant post - actually there were NO installation instructions included - but I wonder - who of you out there have such a kit in their car? Any ideas and comments on where to mount it? I think in some countries, an onboard first aid kit is required, no?

To Duracon, or Not to Duracon... Never Mind...

$
0
0

So as my OEM shift knob (my second one!) was showing a bit of wear and tear:


 I decided to see if I could temporarily replace it with this nice Tomei brand Duracon shiftknob (S-10 model).
http://www.tomeipowered.com/BTE/index.php/2011/07/30/price-drop-tomei-shift-knobs/
Why temporarily? After all, Duracon is a nice synthetic resin materialthat has none of the drawbacks that the leather does, no?  Actually, it has nothing to do with the material or the quality.  Rather, Japan’s tough road registration rules (“shaken”) require that the shift pattern be shown – either on the knob itself, or on a plate nearby.

When I opened the package, you can see the shift pattern sticker that was included.
Since I’m not inclined to affix the sticker on nearby, I was planning on using the Tomei shiftknob only temporarily, and then replacing with the OEM every time my car gets inspected.

However, upon fitting I discovered a problem (and no, I'm not talking about the dust around the boot!):

See how the knob, even screwed down to the bottom, does not sit flush with the boot? This is what I prefer:

A small detail, yes. But heck I'm OCD (OCD to the point where this photo bothers me, looks like my interior needs some work....it may indeed!).  Yes, I realize I could have gotten the longer L-10 model, but there was one more issue...

I realized that I also like the SHAPE of the OEM grip - it conforms nicely to hand whether you grip like a pistol, or from the top. And leather, even this almost fake leather (Nissan claims it is real), beats out the hi-tech Duracon, ever time, for feel. (notwithstanding the heat resistance properties, etc.)

So for now... I guess I will soldier on with the worn out OEM (I actually have a new one somewhere, just have to find it...)

Trivia and a Mystery Solved: the Kenwood Sound Cruising System

$
0
0
So I was looking for something on the internet, R33 GT-R related of course, and found this:
from: http://homepage2.nifty.com/superio/mygtr.htm
Huh? Well upon reading the description at this person's blog, I found out that these were the tweeters for the optional "Kenwood Sound Cruising System" which was a factory option for R33 GT-Rs (note: it was the only stereo system offered on the limited edition Autech 4 door R33 GT-R).  Of course I had seen passing reference to this in the catalog, but c'mon, the best sound in a GT-R is the RB26DETT, right? So I hadn't paid much attention until now.

Intrigued, I searched a bit more, and found this photo of the amp for this Kenwood system.  The description claimed that this amp was apparently situated "on top of" where the fuel pump is - in other words, in the trunk, on the right side of where the battery is located.
Here it is, removed.
From: http://minkara.carview.co.jp/userid/1210574/car/913848/1593325/note.aspx
The head unit though, didn't appear to be anything too special, an AM/FM/CD with CD changer controls:
From: http://www.gtr-world.net/gt-r/bcnr33/bcnr33-skyline-gtr-4door-autech.html
Check out the photo of the interior front and you can see the tweeters in the A-pillars too.
Anyway, this solved a long standing mystery for me. You see, a while back I had spotted some faint markings on the inside of the A-pillars:
It's very faint, and not indented... just a suggested cut-out template?

Initially, I thought this was used to access something on the inside of the pillars...I was going to investigate but then promptly forgot about doing so.  But now, I finally know what these were supposed to be used for!

Very natural and OEM looking, I wonder if it’s possible to order just these tweeter covers? Of course it’s probably better to retro fit with better aftermarket tweeters, but the covers are cool.

But here is my question to all of you audio experts out there - if Kenwood and Nissan decided to put the tweeters here, does this mean that this exact location is the best location for tweeters? Say if I was to, sometime in the future, upgrade the Pioneer tweeters I put next to the door mirror covers, would moving tweeters to the A-pillar result in an improvement in sound (assuming all other variables remain the same)?

Looking forward to some input! Thanks and stay tuned, should have some more updates soon!

Some More Nissan Optional Parts Trivia

$
0
0
So while I have a couple of car mod posts coming up soon, I first wanted to post up some information I found recently on a fellow R33 GT-R owner's Facebook page.

Miyuki Eguchi is a proud owner of a very red R33 GT-R - in fact she was just featured in this month's GT-R Magazine (apologies for the crooked scan):


Anyway, we had become acquainted (I've never met her in person) when she "liked" the R33 GT-R Facebook page, shortly after it was launched (if you are reading this and haven't "liked" the page, please do so, thanks!).

Recently, on one of her Facebook posts, Miyuki-san posted this:
Photo courtesy of Miyuki Eguchi
 At first, I thought she was posting to show everyone the little rubber GT-R Magazine insert in the area in front of the console box. But then I noticed the weird switch between the coin holder and the "GT-R" badge.  Turns out, this is the switch for the optional quad foglights for the R33 GT-R that Nissan offered (you can see what the foglights look like in the scan of Miyuki-san's car above).  Apparently, the foglights were a very high cost option at the time, hence it is unusual to see a GT-R with those lights, let alone this switch!  And as she explained to me, the "I" position is for the "near" setting, and the "II" position is for the "far-away" setting.  She also informed me that, these "micro twin fog lamps" were actually not that bright, and were apparently also available on the Silvia at that time, albeit with a different bracket.

In any case - hmmmmm - interesting. When was the last time you actually used the coin holder(s)? I wonder what kind of switches I could put there for my car? What switches could I fit there? Ejection seats? Missile launchers? LOL

Miyuki-san also had another goody to show us. The Nissan Puretron (pronounced "Pur-a-tron" in Japanese for some reason). Here is how it looks, installed, on the rear parcel shelf:
Photo courtesy of Miyuki Eguchi
Miyuki-san reports that it still works after 17 years (same age as the car) without issue, and in fact, replacement filters are still available as well! It was designed to remove cigarette smoke, as well as pollen, but of course it doesn't have the "PlasmaCluster" type ozone/ionizing function that the newer ones have.

So how does it work? By way of a remote control, which Miyuki-san says she never uses (which means I guess she just leaves the Puretron on all the time, then?).
Photo courtesy of Miyuki Eguchi
The remote is clipped to the sun visor (and left there permanently, Miyuki-san says, otherwise she'd lose it!) and requires 2 triple A batteries to operate.  Perhaps this unit would be nice to have during hay fever season, which seems to be getting worse every year here in Japan, but installing the Puretron requires the rear shelf to be cut open for the unit.

Plus, I wonder if there is a way to install a new "PlasmaCluster" type air cleaner without taking up too much space? Surely there has to be something out there that can be hidden (not like the current ones which sit in your cup holders).

Anyway - checking out other people's R33s always gives me ideas, so since I stumbled across these two tidbits, decided to share. Hope it was interesting and/or useful information!

Many thanks to Miyuki-san for letting me post this!

Unnecessary Titanium Tower Bar Mod?

$
0
0
Recently on Yahoo Auctions, I saw a Nismo titanium tower bar much like mine for sale. Except this one had a twist - the seller claimed that, in order to prevent the suspension top mounts from rusting due to galvanic corrosion by the titanium / steel interaction, he had applied rubber strips to the bottom of his tower bar to prevent the two metals from touching.

So that got me thinking - is that even possible? On the other hand, even if such a thing did not happen, the titanium, being harder than steel, might cut into the steel and then cause some rust to begin, no?

In any case, I began to do some research. I think the end result was that I wasn't sure, but if I could do something about it, then better safe than sorry.

So here is the tower bar, right after I unbolted it:

Initially, I was planning on cutting bits of adhesive backed rubber foam, similar to what the guy selling his had done. But after a few minutes with the scissors, it was clear that I'm not talented in that department. Actually, the issue was the small rings surrounding the bolt holes, these are slightly raised compared to the rest of the large ring, and it was not going to be easy to cut the foam that precisely.

So I began thinking, too bad I can't just spray on rubber... WAIT! I have THIS:


That's right - I had actually purchased a couple of cans of these for another project (which I hope to reveal by sometime this summer), and so figured, why not try spraying on this "rubber"?  

At first it was quite ugly:

The stuff was everywhere, and oops I got some on the inside of the large ring:

 But unlike paint, this stuff comes off with some friction!

So I applied another coat, then let the bar sit in the sun and then when the day began to cool off, under a heat lamp.  This was the end result:


Well, not exactly pretty, but who cares, no one will see it and so long as it does its job! (and yes, I wiped away the overspray).

Then it was installed back in the engine bay. I figure even if the rubber had not dried completely and it gets rubbed off onto the top mounts, that's still better than raw titanium vs. painted steel (for the record, there ARE a few small scratches there already, likely caused by the stock steel tower bar). 


By the way, the torque tightening figures for the tower bar is 39.3-53.9 N-m (or 4-5.5 kg-m). I have a few others which I will add to this blog's R33 Technical Page in the near future, apologies for not having it all up at once. Enjoy!


HID Back Up Lamp

$
0
0

So awhile ago I replaced my Series 3’s single back-up standard bulb with an LED bulb (S25 size), and while this DID result in a slightly brighter light (or so I thought), given the blacked out rear windows and reliance on my back up camera, parking in a dark space, or at night, could still not be done with confidence. 

Then I heard about HID bulbs being used for back up lamps.  A quick Google search shows that in fact many people have installed HIDs for their car's back up lamps. So perhaps not a big deal, definitely not a “world’s first,” but a nice mod for me nonetheless. And hopefully, it would make backing up at night in my car a bit less nerve wracking.

So here is what the kit looks like:
2 bulbs and ballasts, along with adapters for 3 different types of bulbs
Since my car only has one back up lamp (the other is a rear fog lamp), I installed only one of these pair.  This of course was as easy as pulling out the current LED bulb, and installing the HID. The instructions that came with the kit were extremely poor (they were for HID headlights!?) but it was extremely easy to do the install. Took me about 10 minutes in total – no soldering and no splicing – all I had to do was to plug in the harness with the S25 adaptor, as well as the lead with the bulb, into the ballast.
Just plug in the S25 bulb adapter
All hooked up, ready to be installed
So the biggest issue was, where to mount/store the ballast. When exposed, my car's rear tail light assembly looks like this (the red tap btw is to activate the rear view camera)...
Grey plug on left with red and grey wiring is the back up bulb
While I initially thought I could install the ballast right underneath this cluster of bulbs, I eventually mounted it behind the trunk lining in the rear corner area, onto one of the two bolts that affixes the tail lamp assembly to the body.

Once the ballast was mounted, then it was a simple matter of plugging the whole where the standard bulb would go, with the provided rubber grommet, into which the HID bulb would go in, for an airtight fit!


And the result? Well, I decided to stick in all three bulbs to provide a comparison.
Regular halogen bulb

Super bright LED bulb

HID bulb
So you can see that, with the HID, even in daylight it appears (only) slightly brighter than the LED.

But just a second! I figured, heck if I have the LED bulb out, why not put it into the rear fog lamp, to see how bright it would get – but I was in for a big surprise!
Regular bulb
The same superbright LED bulb!
WAIT!! The regular bulb is actually BRIGHTER!! So while under a clear lens, the LED appears brighter – I think maybe it’s only more blue, NOT brighter lumens-wise. So maybe this was my problem in finding it dark when backing up – the LED may be easier for other drivers to see, but is not actually brighter (Lumens) than the regular halogen bulb! In any case, I think the HID solves the problem, if not I will be back to trying something else.

Another matter of concern is - given the nature of back up lamp use – that is, on for only a short time, and in some situations, on/off on/off in sequence as I jockey (forwards and backwards) to park the car in some very tight locations – will that result in premature burn out?  Interestingly, my other concern that the HID would get too hot did not seem to be an issue at all. I left the bulb on for about 15 minutes to see if would get hot, and while the plastic lens did get slightly warmer to the touch, it wasn’t enough to cause concern.

Finally – I know what some of you are thinking.  If I have a spare burner and HID bulb unit, why not use it in place of the rear fog lamp bulb?  Well, in addition to premature burn out of the back up bulb, I am still a bit concerned about the heat – with a fog lamp, it would be left on a lot longer than the reverse lamp.  The other concern, of course, is given how bright this lamp is – would I call extra unwanted (i.e. police) attention were I to install this?  So something to think about (and a potential future blog post, of course).

Meanwhile – I will have to put this new HID back up bulb through its paces, and hopefully it is bright enough that I can see better on the back up camera!  I will report back when I get the chance, in the comment section.

PS: I got tired of having to look up, from various sources, the various lightbulbs for the R33 GT-R, so I’ve added the entire list to theTechnical Specs section of this blog. I hope it serves as a useful reference.  One thing to note is that bulbs go by different model numbers in different countries – so please use the cross reference link provided if you seem to not be able to find a listed bulb in your country.

oops that didn't work... Rear Aero Wiper Mod

$
0
0
So obviously, not every mod I do goes well.  Here is a prime example.

Afterupgrading the front windshield wipers with the awesome Bosch Aerotwin wipers, people reminded me that I hadn't done the same to the rears.

Unfortunately, I haven't found a model from Bosch that works for the rear window yet, as the air is coming in the opposite direction than for the windshield. So I suspect to have an aero effect, the shape of the aero blade would have to be reversed.

I did stumble upon, however, an "aero" blade on Rakuten here in Japan, for a very cheap price - around 1000 yen! Recalling that when I measured the OEM rear wiper, it was 450mm, I ordered it, figuring it would be an easy mod to do (and a way to complete the Bosch wiper blades post).

It arrived quickly (the green is a clear plastic cover protecting the rubber blade):


 But I immediately noticed that there was a difference:

The clip area on the Bosch wiper is much nicer - no weird holes, and enclosed. I guess this is why the non-Bosch ones are "universal"?  But "who cares" I thought, these will be in the back, no one will notice. 

Comparing with the OEM rears, the length looks pretty good!


Now to check to see how they fit.  Good news was, they fit on the "J hook" perfectly, without drama. The BAD NEWS was - after the J hook fit into the universal clip - the wiper itself was too long!
oops....
The OEM wiper is a comfortable 2cm away from the spray nozzle.  This photo shows the new aero blade just grazing the spray nozzle, but in actuality the blade would rest on top of the nozzle a bit more. So even though the blade LENGTH is the same, the location of where the arm meets the blade is different.  If I were to order another of the same series, to be safe I would order the shorter 400mm.

But there MUST be a Bosch for the rear, and this mistake only cost me 1000 yen, so I will keep looking...  oh and as for the rear nozzle, it appears to be stuck somehow to the glass, so I'm not going to mess with it. Stay tuned!

Finally....A Rear Diffuser!

$
0
0
Details to follow in a multi-part post!


BNR34 Rear Diffuser Project, Intro

$
0
0
So I’m not sure why this mod is not more popular overseas, I've seen a couple on R33s at the SSCT gatherings, and even on the Minkara car blog here in Japan, there are several examples of people who have installed the R34 V-spec rear diffuser onto their R33s.

In my study of the R33 GT-R vs. the R34 GT-R, one obvious engineering difference, if not THE difference, was the aerodynamics that the R34 had. And, the most obvious piece was the rear diffuser. Thus, I’ve been wanting to do this mod for quite some time now.  So I did some research, learned that it basically bolts on, but first I wanted to confirm this so and then found and bought a used BNR34 diffuser on Yahoo Auctions.  This was over two years ago! (so yes, it sat there collecting dust all that time...)

It turns out however the tricky part was, despite its “bolt-on” nature, figuring out exactly how the diffuser would be attached to an R33.  Luckily, all that is really needed is to either weld on the necessary nuts onto the existing “triple cross bar” or to replace the R33’s triple cross bar with the R34 V-spec’s triple cross bar, which happens to be identical except for having the necessary brackets already welded on.  The triple cross bar is three pieces of pipe in the rear that extends from side to side in a rough “U” shape - here is what a standard R33 “triple cross bar” set looks like (bottom piece is towards rear, top is in front of the rear wheels) :

Courtesy http://minkara.carview.co.jp/en/userid/886880/car/866742/3781685/parts.aspx
And here is the R34 one, with the differences (that is, where the diffuser is bolted onto towards the front), highlighted:
Courtesy: http://minkara.carview.co.jp/en/userid/301215/car/194604/415795/note.aspx 
So I first had to find a used 34 V-spec triple cross bar. This I did by contacting a dismantler.  Then, it turns out that the used diffuser wasn't in the best condition, either missing some brackets, or the existing ones were extremely rusted and bent out of shape, so I had to find a tuner that could supply me with replacement brackets.  
Yeah, this isn't going to work...maybe stainless steel is a good idea, given the location?
I searched for a while in Japan and found one place that was prohibitively expensive – however Allen at Tomei Powered introduced me to RB Motorsports in the UK, who had a bracket kit of stainless steel brackets, bolts and rivets, just for this purpose!  

Unfortunately, as I found out later, this solution was not a complete one.


So after collecting the diffuser, the triple cross bar, and a set of bolts and brackets, it looked like I was good to go. I now had everything I needed to do the install. So this project was essentially broken down into the following steps: 1) restoring the carbon diffuser and then 2) ensuring the diffuser could be attached to the R33, 3) temporarily attaching the diffuser to get it to my tuners shop and then finally 4) full installation, including getting custom brackets made in order to make it work for the R33.  In order to make this easy reading, I’ve broken up the posts into 4 sections. 

Meanwhile, here are some links to Minkara posts showing other R33s with the BNR34 diffuser mod:

A nice LeMans

Black V-Spec

Silver Tommy Kaira tuned

White Race Spec

Midnight Purple Autech 4 Door GT-R

R33 GTS25T Type M

Midnight Purple 2.8L (with decent photo instructions)

Stay tuned for Part 1, next!

BNR34 Rear Diffuser Project, Part 1: Restoring the Diffuser

$
0
0
So given the condition the OEM BNR34 diffuser that I got on Yahoo Auctions (for relatively cheap) was in, it needed to be freshened up.  This meant removal of as many rusted or bent, broken parts, and replacing with new or refurbished.   Also, it meant that the carbon itself would have to be sanded down and a clear coat applied, where applicable.
Bent fins, scraped up carbon fiber, rusty bolts and rusted leading edge plate
As you can see clearly here, the leading edge of the diffuser is rusted.

This shows clearly how the supports for the fins are rusted as well

Left rear bracket is rusted and bent

Right rear bracket is in much better shape, although there still is some rust.

I guess this happens a lot, but check out the condition of the fins, as well as the rusted bolts, for example.
These side guard things are scratched up, the bolts rusted and the fins bent!
So I removed everything that I could easily. That included the side guard things (as above), the front brackets (thing on left in photo below), the side brackets (one was severely bent up), and the fins. 


With the fins, you can see how much dust was trapped underneath each one! 
excuse the mess in the garage...lol
Also, the side guard things (made of ABS plastic) were scuffed up, and in some places, damaged, so they needed to be repaired. The best I could do, of course, was to sand down the rough spots, and then spray on the spray rubber (Plasti-Dip).
BEFORE


AFTER
Came out OK though. I mean, you really can't see them, so as long as they are looking shiny and newly protected, I'm happy. 

I then sanded down the carbon fiber in places where it was rough (as well as gently all over), then applied a clear coat, just in case. (Note that the carbon fiber itself is a dry weave and probably doesn't need a clearcoat, if in new condition...)
Nice and Shiny!
After I was happy with how this turned out, I used a rivet gun to reattach the side pieces, this time with stainless steel rivets:

The end result being this - note that I did not attach the fins back on.  Also note that I replaced the front brackets with stainless ones from the RB Motorsport kit (one on the left attached here):

So in Part 2, I'll review how I was able to attach it to the car.

BNR34 Rear Diffuser Project, Part 2: Fitment (Attempt)

$
0
0
So after the diffuser was cleaned up and to some extent restored, the next step was to fit it to the car.  As I alluded in my intro post, the easiest way to do this, is to have the BNR34 V-spec triple cross bar installed (some people chose to have the bolts welded on the R33 triple cross bar instead).

Truth be told, this I had done by Ninomiya-san way back after I first got these pieces, right about the time Igot my personalized number plate

But obviously, I have been too busy to work on this diffuser project since then.

Anyway, the triple cross bar takes care of the front half of the diffuser. In the picture below, the front of the diffuser would be facing left, and the rear to the right.

Again thanks to http://minkara.carview.co.jp/en/userid/301215/car/194604/415795/note.aspx

The front of the diffuser attaches to the left most double hole bracket by way of two metal brackets (like the one on the left in the photo below).  The holes in the middle, take a single bolt, the corresponding hole which is in the diffuser itself.

The rear of the diffuser is attached to the body by way of the side brackets (on the center and right), as well as a center bracket.  The side brackets attach permanently to the diffuser, while the center bracket is normally permanently attached to the car. The diffuser side is the left side with the cutout, the side that connects to the body are the two "fingers" with one hole each.

Unfortunately, the side brackets do not fit directly on the R33 – and that is because the R34 bumper is a bit wider in this area, allowing clearance to the body, which in turn has pre-welded stays for the diffuser to bolt onto. On the R33, the attachment point to the body is where the bumper is (the bumper covers it). Hence, the side brackets either end up attached to the body underneath the bumper – like this (with access holes cut out to access the bolts attaching the bracket to the body):
http://www.wind.sannet.ne.jp/quess/diy/ex-9.htm

Or, get tucked in underneath, like this, with cutouts in the rear bumper or spats to allow bolt access.
http://minkara.carview.co.jp/en/userid/301215/car/194604/415795/note.aspx

Then, there is the rear center bracket. It normally looks like this.
While the RB kit DID come with a replacement piece in stainless, unfortunately its dimensions were off:
Look closely, and you can see that the left side bent piece extends from the 0mm mark to the 125mm mark.  The right side extends from the 300mm mark to the 415mm mark - thus a difference of 10mm! So the left and right sides are not perfectly mirrored, and the angle of the bent pieces are also different. I can't use this!!
Finally, there was the question of re-installing the fins. As seen in my previous post, the stock ones were essentially destroyed, and so of course I sought improvement. I looked at the Nismo ones made of carbon fiber, but not only are they made to order and cost 42,000 yen for the set, their tallness compared to stock is an invitation to getting damaged or snapping off in a parking maneuver. So I settled on these carbon ones from Wisteria Sports, in the same dimensions as the stock ones and for half the price of the Nismo.
From: http://minkara.carview.co.jp/en/userid/705558/car/601264/1470770/note.aspx
So the fact that I did not want to arbitrarily/sloppily drill holes in my car for the rear center bracket, which was off to begin with, as well as coming up with a solution for the side brackets, meant that I would be taking my car to BeAmbitious for the final fitting.

And because of that, I chose not to install the carbon fins myself, but to have Ninomiya-san do it when the car was at his shop.

Stay tuned as I next show you how I got the diffuser to his shop!


BNR34 Rear Diffuser Project, Part 3: How to Get the Diffuser to the Shop

$
0
0
Or more accurately, how to get a BNR34 rear diffuser to the shop when you don’t have the proper brackets in place?

I’m not especially proud of this, but basically what I did was to attach the front of the diffuser using the RB Motorsport supplied bolts, which surprisingly alone was able to keep the diffuser off the ground.  However, the diffuser did not neatly fit around the Tomei diffuser (so there will have to be some cutting), resulting in a diffuser unbalanced left and right. 

Just to be on the safe side, of course, I decided to do what I can to control movement in the unattached back, so I ended up passing twine through the two bracket hole, and then running the string around the license plat frame. Meanwhile, I also used some packing tape between the diffuser and the bumper, to lessen the load on the twine.

The end result was ugly (some would say "ghetto"), and looked like this:

But I WAS able to get to BeAmbitious safely, and so I left my car with Ninomiya-with great anticipation.


Next:  How it all turned out!

BNR34 Rear Diffuser Project, Part 4: Putting it All Together!

$
0
0
So when I went to pick up my car from BeAmbitious, I was happy with  the seamless job Ninomiya-san had done.
Taken at 7pm in the evening, hence a bit unclear... sorry!


First, instead of a four sided rear center bracket, Ninomiya-san simply used two hangar type brackets. 
Simplicity at work here - only time will tell if this is enough.
Second, the carbon was cut in order for the Tomei muffler to peacefully coexist. I couldn't tell how it was cut, it was only apparently after I took the diffuser off for another upcoming project! (Stay tuned!)
Some smooth cutting there, no rough edges.
Third, the entire diffuser was dropped a few millimeters in order for the exhaust pipe to have a bit more leeway on the front side of the diffuser.
For those of you with R34s, you should be aware that Tomei has apparently been sending out a retrofit kit similar to these spacers, in order to prevent the leading edge of the diffuser from pressing into the ExPreme titanium exhaust.
Fourth, the metal jack-up point was moved a few cm forward, and an alumite "gap filler" attached, in order to ensure the jack up point is not only flush with the diff, but also far in front of the Greddy extra capacity diff cover (wouldn't want to jack it up on that)!

But the piece de resistance was the way he used the RB Motorsport side brackets:

Note how, instead of attaching them to the car directly, he chose to attach them by way of hard rubber bushings, in order to prevent any metallurgical issues to the body of the car, as well as considering the vibration the diffuser will generate, and tucked the side brackets up under the rear bumper. This means however that I cannot remove the diffuser with the brackets still attached to the diffuser, as one might do normally.

Rather, I have to undo the bolts for the two outer most fins, plus two additional bolts on the side protectors,  which then separates the diffuser from the side brackets, which remain attached to the car.

And this is why the side brackets and the diffuser's side protectors are not riveted together :
Pointing to where normally there would be a rivet holding the diffuser's plastic side piece to the side bracket 
So neither rivet is there now.
And the effect? Well, that will have to wait, at normal expressway speeds I haven't noticed much of a difference to be honest. Oh and when backing up, now have to be careful not to scratch the fins.
But next track day, let's see what speeds north of 200kph will do!

Finally - I realize I have yet to provide a nice photo that clearly shows the diffuser, in daylight. Patience my friends, I have ONE MORE diffuser related mod before I show the final, final result! 
Viewing all 336 articles
Browse latest View live